Halloween 2012

To celebrate Friday the 13th, there is Eerie Elegance news today! The Tasty Tombstones I created for my Halloween party are now for sale as pre-printed frosting sheets,  plenty early so you can plan ahead for your own party!
Tasty Tombstones now available on Etsy!
I have already been doing a TON of Halloween projects since April, but most I cannot show you since they are part of my epic grand secret plan that is bigger than anything I have ever done before…but I have been teasing with quick sneak peeks on the Facebook pages for Eerie Elegance and Britta Blvd if you’d like to follow there too!
 Be sure to stay tuned, since from now through Halloween, every Tuesday will be something new, with project status here, and including new episodes of Enhanced Eerie Elegance on the Eerie Elegance blog!
My party invitation was sent this weekend! I had no idea this is already my NINETEENTH annual Halloween party…wow! Someday I need to get 1994 & 1995 online, since my web presence only starts at 1996. Sure is funny to look back on those early days, especially compared to what I do now!
Of course you can tell by that letter that I have been planning this Halloween for quite awhile now. I had the first kernels of an idea standing in line at Disneyworld & the Wizarding World of Harry Potter back in March, and by April the kernel had grown to truly epic proportions, egged on again by the same friend who helped me with the Gate Ghost last year. I always enjoy Halloween, but having a collaborator who is also enthusiastic makes it so much more fun! However, the nature of the “epicness” requires most of my work to remain secret until my guests arrive at the party…but I will try to show you what I can without giving too much away!
 Today’s Tuesday announcement is that my new Fabric Frames are now available on Etsy! I had announced pre-orders on the Eerie Elegance blog and the Eerie Elegance Facebook page, but now my custom-printed fabric from Spoonflower.com has arrived, and it looks great! On my list for years has been how to disguise big-screen TVs for haunted houses & castle environments, but it kept getting squeezed off the list for time and lack of screen content anyway, so I put a giant spider over it & carried on. Last year I started looking for anything I could print myself on long spools, but no luck until my friend showed me Spoonflower.com. I had investigated printing fabric last in 2008, and it was quite expensive and required more yardage that I thought I might use. Spoonflower still isn’t cheap, but it’s more reasonable, and you can buy a single yard. I took photos of a bunch of frames at other
  houses and my own, and I carved some of my own frame designs from foam for spookier themes, designed the fabric, then placed my order for the heaviest fabric they have. The fabric is still not as heavy as I’d prefer, but by folding the mitered corners instead of cutting them, the edges still should not flop. Fabric is so much better than all the cheap vinyl decorations, since vinyl shines in light, including flash photography, ruining your atmosphere.
Fabric Frames are $25 each plus shipping $5 US / $17 international. Each kit includes 4 sturdy fabric strips 4.5″x58″ long, instructions and double-sided tape as a compact & easily reusable solution to transform your flatpanel TV from a sleek & modern black hole into a fancy “carved” picture frame that belongs in a haunted house or castle! Check out the 8 designs in my Etsy shop or at the Eerie Elegance order page.
 There are two other new products for this year! I already announced the Tasty Tombstones for sale on July 13th, and I’ve already sent out two orders, one for custom epitaphs! These premiered at my party last year, using photos of my custom-carved & painted foam gravestones, with epitaphs changed digitally into the “punny” thirteen names I’ve been using for years…and they still make me laugh! There’s still plenty of time to buy these printed frosting sheets to use on your own cookies for your Halloween party!
 Also, as of last week on the spooky 13th, I announced the Ghost In Chains video I used for the Gate Ghost last year is now for sale, only $5 for the silent digital download to use in your own haunt!
This ancient tattered Ghost In Chains is silently screaming and reaching toward the living as her aura brightens and fades, until her last attempt causes her to disappear. Show this 48-second clip as a silent loop for your personal haunt in isolated viewing locations like a high window or a corner where audio cannot be heard. Perfect for projectors, video screens, or even reflected Pepper’s Ghost illusions. You are welcome to add your own sounds after purchase for your personal use as long as it is not distributed. You can purchase the Ghost In Chains video on the Eerie Elegance order page!
 Alrighty then, back to projects! The first project was a new fabric stained glass panel for my pantry door. This is the new crest for Castle Brittahytta, and fabric markers and normal markers both work great on white lining fabric. I had tried using my free leftover canvas curtains for a Mardi Gras mask stained glass panel before, but that fabric was definitely too thick. The lining fabric is perfect! I will be making more of these for other holidays for sure, since they are fun to design and fairly quick to make! Just make sure you tape the fabric to cardboard so it doesn’t slip or wiggle and to soak up the ink that bleeds through the fabric.
 Since I didn’t get the beads done on my Victorian Webmistress costume last Halloween, I decided while I had time I should finally get that done. I had though I would handstitch individual beads, but then when I found a nice iridescent aqua fabric paint, I decided that would be infinitely easier, especially for the dots to come closer together towards the center of each web. It looks like I imagined now, like morning dew on spiderwebs in a garden, and so much better than the plain black on black!
 I decided to try another pumpkin patch this year. I didn’t have luck at this house a few years ago, but I have a new location idea this time. I was keeping my eyes open all May & June for seedlings at my local stores, but I never saw any…odd! I had seedlings bought & in the ground by July 5th last time I tried. Luckily I had one pumpkin leftover from last Halloween, and it was only barely starting to rot, so I planted chunks of pumpkin flesh with seeds &
  guts still attached into several pots so I can move them around and a couple spots in the ground. Since I had been waiting for seedlings to buy, I was later than I should have been to plant seeds in mid-July, but at last now I have had male blossoms for a week, so I should be seeing female blossoms pretty soon now too! I might get a few pumpkins growing, but the most important needs are blossoms this month, then plenty of vines by Halloween. I can always supplement my patch with fake pumpkins. 😉
 Back in June, I borrowed my parents’ van to buy my big building supplies for Halloween, but when I brought it back, I brought some pressboard sheets with me so we could cut them with my dad’s circular saw. Many Facebookers have tried to guess what these are for, but no one has been correct yet! You can keep guessing, but this is another surprise…sorry!
 It won’t surprise anyone that there will be new steampunk props, especially after reading the invitation letter from Miss Wells, so I have been collecting junk since April too! My dad let me scavenge in his garage & greenhouse, so
  I had quite a cool Halloween Haul in June, not sure exactly what I’ll use yet, but full of possibilities. My partner in crime knew about a special electronics flea market that runs once a month early Saturday morning, so we’ve been twice and found cool stuff for cheap that should be very useful, several pressure valves, a few working
  electrical meters, and even an old Frankenstein-style knife switch! Then my parents had already brought some stuff down from my grandma’s basement, but when I visted her in August, I filled my suitcase with a dismantled curvy brass chandelier and all sorts of cool brass bits! The lantern, iron scroll & washboard had to stay until my parents’ next RV trip, but quite an awesome Halloween Haul. Thank goodness they didn’t charge me extra for such a heavy load on my flight home!
 Since you’ve already seen the Fabric Frames for sale, you probably guessed I made frames for my own party, so I think I can safely show you these without revealing any secrets. 😉 Storing a giant
  foam frame to fit my 60″ plasma TV would be a pain, hence the fabric idea, but for small wall frames, I had fun designing & carving on foam with my trusty woodburning tool. A basecoat of brown then a topcoat of cheaper gold paint, and they looked good enough to clean up in Photoshop to print onto fabric to sell to others!
Well, I have been busy with so many other things too, cutting & pounding sheet metal, carving in clay, gilding paint, and even more sewing, but I can’t show any of those…darn! Even though a lot has been finished already, I think I’m only about halfway through the giant project plan…yes, the epicness requires not just my notes list like previous years, but a huge shared project plan on Google Docs with over ten accompanying files! I really hope everyone will enjoy the party as much as my partner in crime and I have had planning it! 🙂
Until next Tuesday!
Happy Tuesday! Be sure to check out the first 2012 episode of Enhanced Eerie Elegance, Carved Stone Walls: Part 1, covering cutting, sketching & carving. Painting & aging will be in Part 2 next week!
 Now for my Halloween progress… I had to repot some more pumpkins again this weekend, and even change some stakes to my 5-foot tall iron tripods I usually use for tomatoes. I think that longest vine is at least 4 feet long already! Plenty of male blossoms each day now, but still no female blossoms, so chances are thin I’ll ever get any actual pumpkins, or maybe not until Thanksgiving? 😉
Good thing I’m not worried about having real pumpkins growing by Halloween, since I have a few fake pumpkins I’ve collected over the years I can sprinkle between my vines, which is exactly what I want. The larger fake pumpkins are horribly expensive,  not worth it for me, so I decided to get out my various sized plastic cauldrons, cover with plastic garbage bags, fill in with long rolls of bubble wrap for ridges, and papier-mache some pumpkins instead! The larger one is 18″ across, and I could only find fake pumpkins that large at floral supply stores online for well over $100! After a few more
  layers of newspaper strips, flour & water, and some orange paint, I think these will be decent looking pumpkins for much, much cheaper. 🙂 They will be open at the bottom to set over battery LED flicker lights for the ones that I cut as jack o lanterns, and I definitely will be using them again for the Nightmare Before Christmas party next year!
 Due to reasons I cannot reveal quite yet, much of my party food will be different! No gelatin body parts at all this year, but that should relieve my last-minute party prep schedule from all that food coloring painting. That’s great since there is SO much final equipment setup this year I think I’ll need the time. One of the new food items is a giant Sinister Skull! You’ve seen my small Sinister Skulls before, made in my small thin plastic candy containers and served with blood-red chili sauce and crackers, but this year I have need for a giant one. My friend Tracia bought the new Wilton skull baking pan last year, and her daughter Ashlyn brought a tasty poundcake as her
  Creepy Cuisine last year, so they let me borrow their pan. I lined the pan completely with plastic wrap first, spread 6 POUNDS of room-temperature cream cheese into the cavities, pressing firmly to be sure it would take all the mold shape, covered the top with more plastic wrap, then popped them in the freezer. A week later, they were frozen so solid that I had to set the pan upside-down for awhile until it thawed enough, then the skull halves dropped out on their own. The halves are now covered in plastic, wrapped loosely in foil for protection, and safely back in the freezer until I will thaw in the fridge the night before serving. For the party, there will be a little carving before assembly, and a very special display. 🙂
 One of the episodes I was not able to film last year while writing my latest book was Spooky Spellbooks, partly from lack of inspiration to make any new books to display. Nicely enough, we have reason for new books this year! I cranked these out last week, so watch for that episode closer to Halloween. I realized during filming but forgot to mention on screen that I was aging
  fake books that I made a DECADE ago for my first Hogwarts Celebration! I guess now that they’re 10 years old, they should start looking ancient? You see, I didn’t age them for that party because I wanted them to look like they were just purchased at Flourish & Blotts. Now they look like they’ve been in a castle library for hundreds of years…perfect!
 Even though our annual Halloween Shopping Weekend isn’t until this coming weekend, I’ve grabbed a couple things as I’ve seen them. BigLots had some let’s say interesting (weird?) choices like a football jack o lantern, but this owl was too adorable to pass up, especially since I am doing the Ogle the Owls contest again! When I was at JoAnn Fabrics getting supplies for other projects, I saw their Halloween stock come in, so during last weekend’s big sale, I grabbed all these fantastically elegant silver embroidered black towels on 40% off while I had the chance. I already have plain black towels for my bathroom, and the white handtowels with orange & black cat trim are getting a bit old. These fancy ones will go perfectly now! I might even look for a fancy black shower curtain too…we’ll see!
Until next week!
Happy October! It’s Tuesday update time! Check out the second 2012 episode of Enhanced Eerie Elegance, Carved Stone Walls: Part 2, teaching you painting & aging techniques!
 The tallest pumpkin vine is now taller than me! Even the plants that aren’t as big are blooming well, but I still haven’t seen any female blooms yet, so we’ll see if I ever get pumpkins. I’m glad all these are still doing so well! I will definitely try a front yard pumpkin patch again next year, pots for sure, and I might actually try planting a few way out front along my pathway.
 About 3 layers of strip papier-mache seemed enough for the fake pumpkins to hold their shape, so I cut them off the cauldron forms, then papier-mached them back together. I’m making one more midsize pumpkin with one layer completed already, then I’ll try some plain tan craft paper as the final layer of papier-mache on all three in hopes I don’t have to paint a primer coat before painting them orange. I won’t spend the time making even more of these, since they do take awhile, and I found a nice huge jack o lantern at Target for only $30, plus others for extra 25% off 40% sale price. With 5 to 10 fresh pumpkins from the grocery store that I will leave whole to bake after Halloween, I think I my pumpkin patch will be well-stocked.
 I don’t think you’ll figure out any secrets by me revealing that I have written original music for this Halloween! I haven’t written anything in this style since college *mumble*-years ago, so once I got on a roll, it was really fun that it was working as I’d hoped. I wrote it at my piano, scribbling onto score paper, then entered it into Sibelius on my Mac to be sure it fit together properly. For final recording, I had to get out my ancient classic 80s Yamaha DX-7 keyboard since Garage Band doesn’t have the exact sounds I wanted. Very nice that 30-something-old tech can still play with new…but why does writing music always work best after midnight? 😉
 I wasn’t sure what I would buy this year during Halloween shopping weekend, since I have already been buying party stuff since May, but I did find a bunch of cool stuff. I found the hooting owls at BigLots so I bought two (thanks to Cruella on Facebook for the heads up to look!), more spiderweb dishtowels at Ross to go with the ones I already own, finally a brunette wig for my wig collection at Halloween City for 30% off, but nothing I wanted at Spirit. Since I had already bought the elegant towels from JoAnn, and my costume fabric was purchased back in April, all I bought was some craft supplies, and black crushed velvet with silver glitter spiderweb pattern for new bathroom curtains. I found a silver valance on clearance + coupon at Bed Bath & Beyond to glam up the bathroom curtains too. Hobby Lobby had a black tassel I will use as the tieback in my redecorated bathroom, but their pumpkins were the Funkins expensive ones, which I can’t handle buying even half off! I did score on other pumpkins, which I will also be using for next year’s Nightmare Before Christmas party, so they are a good investment at the prices I found. The plain ones were at Michaels at 40% plus 25% entire purchase, and I especially love all the cute cutout faces in all sizes from Target. Only one Target gargoyle that I couldn’t resist, a web fleece blanket, some cool wire web tier stands, and I did get the elegantly gothic black plastic platters, only disappointed they weren’t any larger.
Sadly I can’t show you any of it without giving too many surprises away, but after some small final handstitching details tonight, my costume will be *completely finished* the first week of October! That hasn’t happened since I was Daphne from Scooby Doo in 2002, and that was a much simpler costume. Maybe planning that far ahead is a once a decade thing? 😉 It doesn’t let me off the hook though…I need all the time I can get since I still have plenty else to do!
Until next time!
Happy Tuesday again! Check out the third 2012 episode of Enhanced Eerie Elegance to be inspired by all sorts of flora that can be Ghostly Greenery!
EDIT: After restoring the entire decade’s worth of photo library from a recent backup, thank goodness I now have photos working again!
 My real pumpkins are still doing very well, and I think this is finally the first female blossom! I noticed it Saturday morning, and here on Tuesday it isn’t much bigger yet, let alone open, but I’m keeping my eye on it to be sure it gets fertilized. Crossing my fingers!
I hadn’t started decorating inside yet so my housecleaners could do a thorough job before I made it more difficult. Now the stone walls are up, soon to be joined tonight by the spiderweb curtains, matching lampshade, door panel and pillows. Since I’m borrowing the antique Victrola from my parents which is on the piano, the gargoyle collection has to move somewhere. They might end up distributed this year since there is already another plan for the fireplace mantel.
") Speaking of decorations, I splurged again. I have had my eye on these solid iron dragon candle sconces from DesignToscano.com since before I bought my house! Since I got the dragon light set last year, I decided these would look nice flanking the tapestry on the living room. I also should have a similar style dragon bell coming soon that I will use year-round on my front porch since I don’t have an electric doorbell. Glad I found their 20% off lunchtime sale online!
Speaking of decorations, I splurged again. I have had my eye on these solid iron dragon candle sconces from DesignToscano.com since before I bought my house! Since I got the dragon light set last year, I decided these would look nice flanking the tapestry on the living room. I also should have a similar style dragon bell coming soon that I will use year-round on my front porch since I don’t have an electric doorbell. Glad I found their 20% off lunchtime sale online!
 As for candles, after several years of being on my list, I am FINALLY decorating the pipe organ with new Faux Flames! I’ve saved paper towel and toilet paper tubes that are large enough to fit LED tealights, balled up foil to support the LED tealight far enough inside the tube so the lame plastic “flame” doesn’t peek out but you can still reach it to pull out the tealight, then used up about 75 glue sticks as wax drips. For the pipe organ these are in clusters, stuck together by the pile of “melted wax” at the base. You can see them lighted above in on the dragon sconces since of course the sconces have candle
  spikes, making battery candles a problem unless they have a tube around them. I just finished the last of the wax drips on everything last night after buying another big bag of glue sticks, so they’ll be spray-painted black next. Since they’re only thin cardboard, they aren’t suitable for outside or overnight use, but inside they’ll be fine for years I’m sure. I’ll probably make a few more in different colors for other holidays and year-round use for my wall sconces.
I’ve been watching for more LED tapers, but Shindigz.com still has the best price vs reviews. I did see some cheaper ones on Amazon but with horrible reviews. When I saw 30% last week and knew they sold out last year, I decided to grab more…sadly only a couple days too early before they DID do a 50% off sale after all…darn! I still have some unpainted from last year, so if I paint all those black, I can fill ALL my taper holders with LED candles this year, then this new order will be painted red for Christmas, plus I should have a few left for other year-round colors too. Final price including shipping came out to $2.91 per candle which isn’t bad when they will never burn down…but 50% off would have been even better!
 Party food has begun! My bone breadsticks batch takes 1.5 hours in the bread machine to make 15-20 bones but only requires 1/4 cup fed sourdough starter, so I’m doing one or two batches during other Halloween project marathons before the starter loses its oomph. I’m up to 36
  barely-baked bones safely in the freezer to be crisped in the oven on party day, with more to come over the next two weeks. Pumpkin pasties need to happen soon too, then the new Tasty Tombstone shortbread cookies will also be in advance. The rest of the food will wait until party week.
New major prop construction has also begun, and a new gravestone is finished, but they are secrets I can’t show you anyway! 😉 Plenty more to do, and this year I have asked for the whole week off work before my party in hopes of getting everything done. I’m already worried, especially now with my computer acting up! Wish me luck!
For today’s Tuesday update, learn how to make your own adorable & delicious Donut Be Scared Peekaboo Pumpkins in the fourth 2012 episode of Enhanced Eerie Elegance!
Ack! Less than two weeks to my party so I’m starting to freak out more & more, but I am taking all of next week off work when usually I only take one or two days off, so I hope that helps me get everything done!
 Speaking of pumpkin donuts, those are planned for early next week, along with my first attempt at making rosettes with my new spider form. After those are both done, the deep fryer will be put away again. In other food prep, as of late Friday night, just shy of 8 dozen Pumpkin Pasties are now in the freezer on covered baking sheets, ready to bake on party day, which is a huge relief since they take a long time to prep. After several sessions with the bread machine, I’m now up to 128 Bone Breadsticks in the freezer, but if I have over 60 guests like last year, that’s only 2 each, so I think I still need more. Glad that’s more of a timing and waiting issue so I can multitask!
 I might just get a real pumpkin in my patch! A different female blossom I hadn’t noticed yet had just closed when I checked on Saturday morning, so I gently pulled the petals back and fertilized her well with plenty of pollen I collected on a cotton swab. The other female blossom still is nowhere near opening yet, but I can hope. I will definitely plant my pumpkins earlier next year, now that I know the pot idea works so well in my yard.
 My papier mâché pumpkins are finally done! I gave up on a plain paper final coat so I used brown paint as a primer coat so no text showed through. After that coat was dry, I sprayed orange lines on the highlights of the pumpkin ribs first, then lightly filled in the shaded grooves. The orange was too bright when I was done, so I lightly dusted with
  brown again to tone down the orange to a more natural pumpkin color. I think they will fit in nicely with the other pumpkins, but they won’t last through sprinklers. I know because I forgot and left them in the grass overnight…oops! Only a few spots got soggy and try dried okay in the sunshine, but I won’t make that mistake again!
 My eerily elegant new bathroom decor is done! The best fabric of silver webs on black this year was glitter over crushed velvet…very luxe looking but the glitter sheds EVERYWHERE! I’m very glad my housecleaners are coming the day before my party, since hopefully they can take the extra glitter with them. 😉 I like how the strip of web fabric added to the silver clearance valance ties in the the web curtain now sewn behind the valance. I would
  rather have a plain black silk curtain for the rest, so I’ll keep an eye out to upgrade next year. Probably a different tieback for more contrast, and the black tassel blends in too much. Perhaps I can design a custom silvery spider tassel next year, too, but the beaded spider is okay for now.
My house interior is getting there! The Victrola is set in place on the piano, most of the black LED taper candles are in place, tapestry and spiderweb lace curtains and pillows are out, and the Catoween tapestry is over the couch, but hanging the spooky wall art is still in process due to secret projects still underway….bwahaha!
 The pipe organ now has its own Faux Flames! It took an entire new can of black spray paint for just these since the paper tubes sucked up so much paint it required several coats until I
  was satisfied. I still need to paint the other individual tealight covers and the rest of the LED tapers for inside decor, but that’s easy to do between other projects.
Major construction is going fairly well, but still a lot to finish! The castle has some new architectural features, several of which were painted with final accents just as dusk was falling Sunday evening. I never thought I’d use leftover paint from my aqua bathroom for Halloween projects, but it was  perfect and worked like a charm in the power sprayer I bought last year. More foam carving and painting to come this weekend though!
There were two more extremely late nights of essential party prep, but I can’t reveal more…so I think that’s all I can tell you for now, sorry! I’ve re-arranged my own party prep schedule for this weekend a bit because I am very excited to attend Scary Jerry’s Halloween party this Saturday! I love meeting new friends because of Halloween! 🙂
Only one update left next week before my epic grand party plans will be revealed!
Happy Tuesday again! Today, watch how to make your own cheap & simple Spooky Spellbooks in the fifth 2012 episode of Enhanced Eerie Elegance! Only one more episode before Halloween!
Fresh fruit & veggies are still to be purchased, and that’s a significant part of this year’s menu, but my freezer is overflowing with Bone Breadsticks! I have just over 200 now ready to finish baking on party day, so I sure hope that’s enough! The giant cream cheese Sinister Skull won’t be carved & assembled until party day, but I’ve made a few smaller cream cheese skulls to place on the other food tables to spread out the creamy goodness. 😉
 There aren’t as many cookies this year, but 9 dozen new Tasty Tombstones are ready to serve. It took forever to cut out all those the frosting sheets, but they looked great. Unfortunately I had to replace the Nucoa non-dairy baking margarine that I haven’t been able to find anywhere since February. Very sad my trusty non-dairy baking friend seems to have disappeared! I was forced to buy the ONLY vegan margarine at Whole Foods, at triple the cost, and it doesn’t work quite as well as even the reformulated Nucoa. All the other margarines on the shelf include milk, so not good for my non-dairy friends or my vegan friends.
 Spooky Spiders black rosettes are scheduled for Wednesday so they will stay fresh & crispy in my airtight cookie tins, and so my friend & trusty house-elf Angie can help. The pumpkin donuts will be Thursday since there is NO FREEZER SPACE LEFT, then the deep fryer can be put away before the housecleaners come on Friday. The donuts will be reheated on party day to crisp again, then we’ll see if I have time after they cool to decorate them or not. Glad they are tasty just plain too!
 Interior wall art of spooky portraits and other items are very nearly arranged to my satisfaction and I’m sure that will get done this week. All candles, real & fake, are ready to go. Due to all the major projects still in process, both final patio setups are still underway. I’m always worried about hanging the bookcase mural wallpaper too early since you never know when rain might surprise us in late October! It rained Sunday night just as we got the first major decor up on the roof with forecast to keep raining until Thursday…ack!
Last yardwork of lawnmowing, edging & pruning was done on Saturday since now I need to decorate outside! Sprinklers should be ok to keep running until Friday unless we have a ton of rain, then I will set out all the pumpkins & the pots in their final arrangement and turn off the sprinklers until after I undecorate. When it’s sunny again, the potted pumpkins might need hand-watering so I’ll keep an eye on them.
 The skull fountain keeps leaking while it’s stored in the heat, so I’ve sealed it yet again with silicone caulking. There was also a sticky splashback problem last year even after drilling more drainage into the plastic skull, so I’ve tried again. That mess was a pain to clean up since it even splashed onto the bookcase wallpaper as well as all over the chalkboard & lab table, but it needs to stay in the Library Laboratory for secret reasons. The lemonade cauldron will be on the outer patio.
The castle walls will be going up on Thursday since I’m worried about wind blowing them down, let alone the rain forecast until then. I couldn’t find large clear washers for sale, but I had some clear acrylic scraps, so I cut them into rectangular washers & drilled screw holes myself. Hopefully these will stay in place better, since last year the day after Halloween, wind started blowing down ramparts one by one as I raced to take them down  without breaking!
Webcams are ready! Ideally I would have 3 webcams this year but I waited too long to decide to buy, so I’m just moving the inside cam to the backyard to view the outer patio. Since the wifi doesn’t reach through my stucco walls very well, especially to the back, I have a maximum-length ethernet cable running out my living room window & over the roof to the backyard. No advance peeks this year since not only is rain not good for electronics, but there are too many spoilers! On party day the webcam links will be live at camera.britta.com.
That’s all the time I have until after the party! Everyone enjoy your Halloween weekend and Happy Haunting!
In the final 2012 episode of Enhanced Eerie Elegance, there’s still plenty of time to make your crudite tray into Vicious Veggies with quick and easy tips for last-minute Halloween parties!
My huge Halloween party was a grand success on Saturday, so no further party prep to update, and I’m still taking catchup photos on Halloween night when everything is set up again for trick or treaters before I can show you everything properly. There is a LOT to document that I will split into separate project posts to do them justice, so keep watching for a week or so…but for now here is just a peek… 🙂

Hope everyone has a fabulous Halloween! Happy Haunting!
 My most epic Halloween yet was a success! 62 adults & kids attended my 19th annual Halloween party! My glowing fiber optic cloak for my medieval warrior queen Ghostly Guardian was a big hit. It was fantastic that all the adults were impressed at my multiple hauntings, but I think my favorite reactions to all 6 ghosts were from the kids ages 3 through 7 who absolutely loved them and had to keep going around looking at them again & again! Thanks to everyone for a great party, and HUGE thanks to Cat for taking such fantastic photos! Very nice to have a professional photographer as a party guest! 🙂 I’ve included some of her shots here, but check out her whole party album at Photography by Cat!
How was this party so epic? Not only did the castle get a new tower and 5 faux copper verdigris spires, but there were 7 moving portraits and 6 ghosts that were all members of the same family throughout its history, starting with the founder of Castle Brittahytta almost a thousand years ago. Except for the Ghostly Guardian which was  my new costume for this year, each character was inspired by a costume I already had, then my “ghost writer” and I created a story for each of them that informed the performance and setting of the portrait and the ghost. I filled up a full terabyte hard drive with video footage & render files from all 13 filming sessions throughout the summer with me as actress, wardrobe, makeup, set design, and editor! I was very glad to have my “ghost writer” assist as writer, director, lighting design & cinematographer. We have more background & story than we expected anyone to notice during the party, since we
  wanted the moving portraits to seem natural with less frequent content repeats, plus telling the saga of this family will continue for years well into the future. There was some additional planned epicness that didn’t make it into this party, which explains all the steampunk stuff I collected that you won’t see, but I won’t reveal any of that yet since it definitely WILL happen for 2014! Next year is already set as the 20th anniversary of Nightmare Before Christmas as my 20th annual party, you see. 🙂
 I was extremely thankful that my “ghost writer” was in the trenches with me with only 3 hours sleep and frantically getting everything ready all day. Amazingly even after such a trial by fire, he still wants to help again next year & onward! 🙂 At least I was getting into costume before the party start time of 7pm, but the final food prep would never have happened so well without Melanie’s help from 4:30pm well into the party! She did the Violent Vertebrae, veggies, fruit, cheese, crackers & cookie setup! Thank you SO much! Guests started arriving at 6:59 and kept coming!
  It was so warm inside I cut the final oven use from the menu so no bat wings or brie in pastry, but we still had plenty of food. It was so warm inside that my food on the dining table was left idle in favor of all the Creepy Cuisine brought by guests since that table was outside where it was comfortably cooler. By 10pm people were starting to talk about leaving, so I herded everyone to the back patio for the awards. Each winner received an Edible Medal of vegan shortbread on a stylish black & white ribbon!
Outstanding Owl Ogler was tricky because 11 owls were all in the portrait and frame of one of the characters, including her necklace! I know some people found the necklace so it was definitely visible, and that was expected to be the tiebreaker owl, but there was still a tie with 20 of 21 owls found by both Patrick & Angie!


 taking the time to tally up all the votes!
Scariest Costume was Ashlyn as the Weeping Angel from Doctor Who…she was creeping up on everyone all night then revealing her scary face, just like in the show.  But keep out of the way of her cardboard wings!
Most Creative Costume went to Jen as at-that-time-still-pending Hurricane Sandy, complete with inside-out umbrella, rain poncho and nametag sticker “Hi My Name is Sandy!” Very clever!

Usually Ultimate Costume goes to a group, and I saw two contenders, the White & Dwarves Mining & Construction team, or the Doctor Who Crew…but the overwhelming cheers went to Elisabeth and her handmade Tardis! Fantastic job!

Scary Jerry brought tasty almond Finger Cookies, but the Creepy Cuisine medal didn’t fit around his head! He said he liked wearing it as a headband…haha!
") Ashlyn double-medaled with her Eye Candy Creepy Cuisine, and since so much of the other Creepy Cuisine had been consumed before I could see it, I awarded the last Creepy Cuisine Edible Medal to Louie since his costume was Buffalo Wing with Blue Cheese Dressing!
Ashlyn double-medaled with her Eye Candy Creepy Cuisine, and since so much of the other Creepy Cuisine had been consumed before I could see it, I awarded the last Creepy Cuisine Edible Medal to Louie since his costume was Buffalo Wing with Blue Cheese Dressing!
 Now delving into decor! To describe the experience, as you walk up to the castle, you first see the well under the front tree, hearing rattling chains and gurgles of someone in distress. Looking into the well you see the Watery Wraith, trying her best to keep afloat despite the heavy chains dragging her down into the depths (click for video)…
 Peeking out between the tree branches you look up and see the tall tower with the Ghostly Guardian medieval warrior queen on the balcony watching over everyone who approaches (click for video)…
 To the right in the middle tower windows you see the ghost of Swashbuckler Sally sparring with an unseen foe back and forth from window to window (click for video)…
 Walking up to the front porch through the pumpkin vines, you see the ghost of the Pumpkin Queen haunting the gate in her pumpkin patch, a few pumpkins already carved as jack o’ lanterns with flickering lights, even including an owl pumpkin. She appears in the distance, walking towards the gate, raising a big knife menacingly as she comes closer, but as she arrives at the gate, she bends down and starts carving one of the pumpkins in the pile…
 Inside the house the big TV is now a wall portrait named Ergelise Queen of Verdigris at her piano, but every so often she moves, and sometimes turns around to play (click for video). You see her wearing an elaborate signet ring and a unique necklace of a copper dragon with a crystal orb. Other moving portraits are in the living
  room (click for video), above the piano (click for video), above the dining table, and 3 on the wall in the hallway, but only some have nameplates. Above the fireplace is a copper & verdigris dragon shield that must be the Verdigris family crest, with a similar design in the
stained glass pantry door…
 Venturing out into the Library Laboratory, on the table in the corner there is a large bottle on a stack of books that has a small ghost inside…it looks like she is laughing & toasting everyone, refilling her brass mug from a large bottle (click for video)…
 Farther out into the yard you hear pipe organ music coming from the chapel and the door is open so you peek in. You see the ghost of an 18th-century French style woman in elaborate white wig & tiara playing a somber tune on the pipe organ. She plays for awhile, turns to look over her shoulder, fades away, then reappears and begins to play again (click for video)…
 When my friend who has attended 17 of my 19 annual parties arrived, she immediately said “I see what you mean by epic!” Everyone echoed her, which was extremely gratifying after so much work, and even trick or treaters on Halloween night were highly impressed, as you can hear in this video, even if you can’t see much… 🙂
I know this was already a long post, but this is nowhere near the full story yet! Still to come are separate posts with details and behind the scenes how-tos about my Ghostly Guardian costume including the glowing fiber optic fabric cloak, the moving portraits, and each ghost, since the ghosts used so many different techniques. Stay tuned for those coming in the next couple weeks, and be sure to check out all the party & decor photos below!
 Longtime readers might remember that I’ve been trying to make savory Fried Spiders for years, but only minor success since they were very fragile and many fell apart on the display tray. When I saw this spider rosette form on Amazon, I absolutely had to try them!
 I have enjoyed eating rosettes many Christmases in my life, but I had never tried making them before and my mom never made them either. Luckily I have a friend Kathy who is the Rosette Queen, so I asked her and she graciously replied with her secrets. I used her tried & true recipe & tips, replacing the eggs & milk with vegan substitutes and added a couple drops of black gel food coloring while mixing in my blender that is older than I am. Frying them in the deep fryer also older than me, then sprinkling them with fine black sanding sugar instead of powdered sugar, we had adorable fuzzy, black, crispy, fried, tasty tarantulas!
 These take a LONG time since you are frying each one individually for 2-3 minutes, adding sugar while reheating the metal form, then repeating, so it took about 5 hours to make almost 9 dozen, which was only two batches of batter. I was so glad that Angie volunteered to help, since not only was I able to get other decorating done while chatting with her while she fried spiders all afternoon, but she had a nostalgic blast back to when she & her mom would make Christmas rosettes in North Dakota! They always used granulated sugar on their rosettes, so Angie knew tips how best to use the black sanding sugar. I love it when a plan comes together!
I was a little sad that most of my party food went uneaten because it was so warm inside, but the benefit to having 7 dozen spider rosettes leftover is that now I know as long as they are kept in a good airtight cookie tin with wax paper between layers, they last over 2 weeks still crispy and tasty! One week is probably a slightly better flavor, but I enjoyed eating them all the way to the end, black tongue & all. 🙂
 Spooky Spider Rosettes
aka Fried Spiders
adapted from
Kathy Henricks Traditional Scandinavian Rosette Recipe
2 eggs, slightly beaten (or Ener-G vegan egg replacer)
1 cup milk (or rice milk)
2 teaspoons granulated sugar
1 cup all-purpose flour
1/4 teaspoon salt
1 tablespoon vanilla extract (or almond or lemon)
couple drops black gel food coloring
canola oil or vegetable oil for frying
Add eggs (or egg replacer) first in blender and mix well. Add sugar and milk then mix again. Sift flour before measuring into blender, then add salt and mix again until batter is smooth and about the consistency of heavy cream. Add flavoring and food coloring. Let the batter set for about 30 minutes in a flat-bottomed shallow container large enough to fit the rosette iron form. While the mixture is resting, heat the frying oil to 375F, either in a heavy pan or deep fryer. Oil should be hot enough to brown a piece of bread while counting sixty.
Once the frying oil is up to temperature, dip the rosette iron into the hot oil to heat it for at least two minutes, then drain excess oil on paper towel. Dip heated iron in batter to not more than three-fourths its height. If only a thin layer of batter adheres to the iron, dip it again until a smooth layer forms. It will be partly cooked, from the heat of the iron. Plunge batter-coated iron quickly into the hot oil and cook from two to three  minutes until active bubbling ceases. Remove from iron and drain on paper towels. If they will not release on their own, use a table knife to gently push them off the iron. Immediately put the iron back into the oil to reheat, then sprinkle the finished rosette with powdered or granulated sugar. If your rosettes are not crisp the batter is too thick, and should be diluted with milk.
One last hint from me is to use a container only slightly larger than your iron form shape for less waste. Even though we had the perfect size flat-bottom dish, I still had a layer of batter that refused to stick to the iron when it got too low…but the hot iron cooked the spider in the dish! 😉
Hope you enjoy making Spooky Spiders!
 You probably already guessed that my moving portraits were inspired by the Harry Potter universe, specifically my trip to the Wizarding World theme park in March. Actually, the first idea was normal portraits to go with each ghost as a matching game, but then I decided I had enough budget to buy or otherwise acquire all the necessary video panels in addition to the extra ghost electronics equipment, so if I had to dress up for the portraits again anyway, why not film video?
 The original idea spark was knowing I wanted to move from one ghost last year to several ghosts this year, but how, who were they, and what would be their stories? While standing in line in Orlando, I had a glimmer of a thought that maybe I could use some of my previous costumes as members of the same noble family from the time of the founding of Castle Brittahytta and throughout its history. They were the same family since I couldn’t avoid them all looking like me, even though I borrowed some
  wigs from friends and bought a couple more to help me look different enough. I wrote some basic character sketches based on costumes I had, came up with some fun names that wouldn’t sound out of place with Britta, arranged them in an approximate timeline, including how a branch ended up in America for Hermione G. Wells to inherit the castle. My “ghost writer” turned those character sketches into an elaborate epic plot that will take years to reveal…awesome!
 Obviously my 60″ plasma big-screen TV permanently in my living room would be one portrait, I borrowed my parents’ extra 32″ flatscreen TV, and I borrowed a 17″ flatscreen monitor from a friend, but I needed 7 screens total for all the portraits. I don’t have enough wall space to hang all flat panel TVs everywhere, plus that’s more expensive than even my expanded budget, so I was hoping to use photo frames for smaller portraits, then buy one medium flat panel TV that I could use as an external monitor for video editing year-round. After some research & comparative pricing, I
  found Aluratek cheap basic photo frames on Amazon, with various sizes all the same brand, bought a small one as a test using all free points from my March vacation Amazon Visa spending, and after online searches and Windows-only video conversion shareware, finally got the video converted from QuickTime to the Motion JPEG AVI with mp3 audio format that works on most photo frames…whew! Over the summer I kept buying more when the month was up and I had more Amazon Visa points to spend, until I had three 12″ 4:3 aspect ratio frames and a 32″ widescreen TV that could run video off a USB flash drive!
 Of course all those panels were black modern frames, not very portrait-looking at all. I had enough thin foam sheet scraps to make custom carved foam frames for the 3 small portraits and my 32″ TV. All those frames were styled to the portrait inside, some as extra character clues that won’t come into play until later stories are revealed. For all the frames, the foam was cut out to nest around the electronics so they would stay on without any tape, and for the most part that worked. I painted them all with a brown basecoat first, using an old brush to cram paint into all the carved areas, then after the brown was dry, I dry-brushed with gold paint to leave the brown showing all the carved detail.
 Ever since I got my big TV several years ago I have wanted to disguise it for Halloween, but I kept looking for a way that would be stored easier than big carved foam strips. Since I didn’t have any content to show on the big TV anyway, that kept getting shoved “until next year.” Last year I started looking for anything I could print myself on long spools of paper, but no luck until my friend showed me Spoonflower.com. Fabric is so much better than all the cheap vinyl decorations, since vinyl shines in light, including flash photography, ruining your atmosphere. I had investigated printing fabric last in 2008, and it was quite expensive and required more
  yardage that I thought I might use. Spoonflower still isn’t cheap, but it’s more reasonable, and you can buy a single yard. I took photos of a bunch of frames at other houses and my own, plus some of my carved own frame designs from foam for spookier themes, designed the fabric, then placed my order for the heaviest fabric they have. The fabric is still not as thick as I’d prefer, so I add iron-on interfacing to the back so the edges won’t flop as badly, plus that helps seal the edges from fraying. The closer your Fabric Frame is to the width of your actual panel frame, the least risk of flopping. Because the monitor wouldn’t hang flat against the wall and tipped forward a bit, Sarina’s frame tended to flop at the top unfortunately, but I still liked the illusion. Three of my portraits used Fabric Frames, and I had them ready early enough to sell a few this season on Etsy!
 The portraits themselves required planning with the ghost filming, since many made sense to film the same evening while I was in costume, wig and makeup. It was easier to control the set lighting by waiting until after dusk. The only one we filmed the ghost first was Sova, since we needed the original tattered all-white ghost dress to film the Watery Wraith in the well, then after that was done (and fully dry again!), I altered her dress into a tidier princess dress by folding all the tatters into a wide handstitched hem and adding fresh gold trim to the neckline. I had planned for Sova to have long blonde hair, but my secret circle all voted it was easier to
  match to her ghost with the same long stark white hair, so it became part of her character story. There were so many back and forth suggestions from online video clips requiring resetting and refilming the next day, that I requested my “ghost writer” to be present as director for all future filming! That worked much better since he couldn’t ever come up with anything in advance when I asked, but on the spot his ideas were many and great.
 We intentionally made the portraits sitting still for quite awhile, trying their best to behave, with only minor movements like eyes blinking, looking around, adjusting their hair and clothing to proper portrait appearance, candles flickering, crystal ball changing color, and leaves rustling in the breeze, so they would only attract attention on second glance “hey, did that just move?” Since it’s much easier to loop a static background, all of the portraits left the frame at least once in their long loop, and most had several clips linked together in the long loop, so they left several times. We didn’t want them all leaving at the same time, so all the clip timings were different on purpose. A short loop with a lot of movement would be really obvious it was just looping, but if the loop was 10 minutes or longer, we sincerely doubted anyone would ever stand around watching the whole thing to find out when it looped! Each character had at least one action specific to her character,
  like Ergelise turning to play her piano, Sova shushing her hooting pet owls, Sarina brandishing her sword, and the First Queen greeting people at the entrance. However, we did come up with “easter eggs” in case someone happened to be walking by at the right time, many of which are clues to the larger story, with some that won’t make sense until years from now. There were also some that were just funny, like Queen Meresinine “Merry” Verdigris, so you should watch that one all the way to the end. 😉
 I think the most hassle was the poor Pumpkin Queen! First of all, when I originally made the costume in 2008, I never finished the leaf sleeves nor the final crown decoration, plus now she needed the Verdigris dragon emblem on her crown too, so those were added this summer. At least the sleeves were already cut out and I knew exactly where they were. Then I kept waiting and waiting for my pumpkin vines to bloom, but once they finally did, the blooms would close up before noon…ack! I am not a morning person, especially on my precious weekends when most of these were filmed! That explains my puffy eyes…heh! Since I didn’t even plant my pumpkin seeds until mid-July, the blooms were very late, but we finally had enough to look good by early October. The day beforehand I arranged all the pots & fake pumpkins
  in my backyard in a shady spot for best lighting, including tying mini plastic jack-o-lanterns to the vines like baby pumpkins, then we got up super-early for the last chance at the local flea market for cheaper video cables, came back to put my contacts in & get in wig, makeup & costume so we could be done filming before 11am. At least once we got started it went fairly quickly, since there was
  only so much she could do to care for her precious pumpkins, and we knew the noisy backyard audio would need to be replaced anyway. As a tie-in to the original music I had written that Ergelise played on the piano in her portrait, I sang the Ode to Verdigris a cappella to the pumpkins and added the audio in post…but I think my favorite part is how the orange skirt poofed out when she squatted so that she looked like a pumpkin herself! 🙂
 You might have noticed by now that each set is also specific to each character, even though many were filmed in the same spot in front of my large living room window. This is perfectly appropriate for painted portraits which often tried to represent the character with props and still life arrangements around the subject. I even researched possible poses to be authentic to each era. Not only did the Pumpkin Queen costume finally get finished to my original plan after a 4 year hiatus, but the Victorian Webmistress also got her “dew on spiderwebs” beading after running out of time last year. Set design was fun, gathering stuff from around my house that might be useful, making sure the backdrop colors were different for each so the location wouldn’t look the same but still be period-appropriate, and even making new props, like the Verdigris crest stained glass window. One big unexpected problem was the volume seemed loud compared to normal conversations, but the ambient chatter of party noise was so loud, no one could hear the portraits that spoke! I cranked up the volume on those later in the evening, then some people were able to hear them, but duly noted for 2014 when the clues will be more meaningful, especially what the Webmistress says as she hangs over the dining table. 😉
There were some frustrating technical difficulties I couldn’t figure out how to overcome. Using the exact same video formats & settings from QuickTime through the Windows conversion program, I ended up with a perfect Sova audio track timed with the action for a long video, but no matter what I did, after converting to Motion JPEG AVI, the Merry audio always went off track about 3 minutes into the video, so that the clinks when she poured and sips she took were heard before the action happened…annoying! The monitor I borrowed squashed Sarina fat even though she  was the proper 4:3 aspect ratio already, and my fancy new TV that could loop USB video showed words onscreen that it was looping, so I had to make a 5 hour mp4 myself to put on the USB stick so it would last the whole party without revealing the silly looping message. I felt like I was in video format hell between getting all these settled plus the ghost videos…my kingdom for one good video standard format across all platforms & devices!!!
There were also big hassles with using Apple iDevices to export video to displays, even though it was nice to have such a small device to hide instead of a DVD player or computer. Online research revealed there were a billion versions of the Apple dock to video cables over the past few years, and some devices would play with old but not new, and I couldn’t nail down model numbers or anything to have confidence buying anything that was a $25-$40 gamble. We had an older iPod Touch that never was used because we had no cables that would work with it. I was VERY glad that the iPhone 5 came out in September, since both my mom & I needed new phones, so I was able to borrow her iPhone4 with a $15 flea-market dock to HDMI adapter even though it didn’t pass-through USB to charge as it should have. I used my iPhone4 to  run Sarina’s portrait via a dock to RCA flea-market in-box cable that had a USB cable that did charge. Since iOS doesn’t have a loop option on the Video app (QuickTime does so why not iOS?!?), the option to create a video playlist is now gone, and no 3rd-party apps would export video over the cables we found, I was stuck with creating 5-hour video files to last the party. Thankfully my mom’s iPhone4 fully-charged was able to run 5 hours of video for the Webmistress portrait without dying!
Here was the final equipment breakdown for all seven moving portraits:
Ergelise: 60″ plasma TV with receiver speakers with MacMini input looping QuickTime mov
Sarina: 17″ monitor (no audio) with iPhone4 dock to RCA playing 5 hour mp4
First Queen: 32″ TV with built-in TV speaker with USB video playing 5 hour mp4
Webmistress: 32″ TV with built-in TV speaker with iPhone4 dock to HDMI playing 5 hour mp4
Hallway Trio: 12″ Aluratek photo frames with built-in speakers with SD cards looping Motion-JPEG/avi/mp3 format videos
 Some last technical notes…You need to plan for hiding power cables and media player input devices when arranging your portraits! The big plasma TV wasn’t moving from its giant articulating mount and couldn’t be rotated vertically, hence why it showed Ergelise at the piano as a logical horizontal portrait. I placed the larger portraits in prominent locations where I had nearby outlets under my table, couch or piano, which were also good places to hide the media players. Since I have shelf space above my hall closet where some of the haunted portrait gallery is usually displayed anyway, I put all 3 small portraits on that wall with their power supplies going up to an extension cord up there, and any visible black cables I painted to match the wall color with leftover paint. This also means you have to rotate your video so that the power cable end is the top of the video. To keep the most resolution and video quality intact, we filmed all the vertical portraits with the camera turned vertically, but some needed to be rotated 180 degrees based on which way the panel decided to display it. They were a bit of a pain to edit though, since rotating then rotating back was horrible for any masking plus took forever to render, so I got a crick in my neck watching sideways! I did try some various filters to attempt brushstroke effects, but I didn’t like any of them since they muddied the detail too much. The irony was that one guest asked specifically for me to send him what effects I used to make them look painted, but I told him it was just standard def video displayed on HD equipment! 😉
 Last but not least were the nameplates. I finally found gold foil inkjet label paper last year, so I printed all the nameplates and stuck them to the frames so they would look like engraved metal. Little did I know that the label adhesive didn’t want to stick to paint or fabric very well, even though it stuck to the plastic trophies last year just fine. 😛 So next time those might have to be glued or some stickier tape to keep them in place, since they are necessary to identify the true names of the ghosts!
It was a LOT of work all summer long all the way down to the crunch time on party day, but overall I was very pleased with the portraits and the guests were impressed too, thank goodness! You can see all the moving portrait photos in the full gallery below if you’d like to click to continue reading. But this was only half the filming & video work…I still have to tell you about all the ghosts, too!
 Of course May is ending and I’m already well into plans for Halloween 2013, so it won’t surprise you that a year ago I was already working on my Halloween costume for 2012! I’ve already explained how it was last March & April when the ghosts & portraits were being worked out, and since I had splurged on a medieval style leather dragon bodice at the NorCal Renaissance Faire the previous fall, I figured I could be the First Queen in the family, the one who built Castle Brittahytta originally back in medieval times. This was the one completely new costume I made, and it was really two whole costumes since we filmed the portrait in full color, then filmed the ghost with different dress & wig, and I was the Glowing Ghostly Guardian live for the party, complete with glowing battery-powered fiber-optic hooded cloak!
 I had seen the fiber-optic fabric a couple years ago online but it was soooo expensive and hard to figure out a project that would be worth all that. I saw it referenced again on another blog last spring and thought that could be awesome as a ghost cloak! Bonus is that a hooded cloak could go over ANY future costume as a glowing ghost, so it could be an investment vs. a single-wear costume! The rest of the costume didn’t cost much at all, but because of the leather bodice & the fiber-optic cloak, this was the single most expensive costume I have ever done. I discussed options with the sellers since I needed panel sizes they didn’t offer in stock to make my cloak, and the higher-density weave sounded much better for my transparent glowing look, but at the same time I bought 2 normal-density panels to make a shawl & clutch just for fun. When they finally arrived in mid-June, I was very glad I paid almost double since the normal-density fabric has a more fabric-like drape but looks stripey as you can see to the left. Since there are over double the plastic fibers in the other, it is much stiffer to work with, but the starry field effect was perfect! I was a bit embarrassed how expensive it was, but hey, I know other women who spend a bunch of money on shoes & purses which I never do, so I considered this 20 years of fancy clothing expense I had never spent! 😉 Glad everyone at the party agreed the effect was worth it!
 A lot of the coordination for the portrait & ghost filming was how to ghostify pieces without being destructive, or at least film the portrait before any pieces would be altered to become ghostly. This was one where I had to film the portrait first so I could alter the bodice, boots & crown for wearing as the ghost for filming and the party. The portrait costume clothing was easy, since I wore my renfaire chemise & brown full-length skirt, my big lace-up 70s disco/Amazon Goddess/Valkyrie boots, and a gold choker from my stash. I scored the wig on Amazon for $14 of free points & braided some dollar store extensions into the wig to make it longer like the white wig I already had. What took so much work were the crown, spear & especially the shield!
 My parents have had a small sheet of plain smooth copper up in their garage for over 10 years never using it, so after begging for years but this time with a specific use, they finally let me have it. I have no idea how much this would have cost to buy, but seeing how copper wiring is stolen from random places, it’s probably a lot! Very glad this was free! The sheet was the perfect size for a shield, so I made a paper template for perfect symmetry, using the same design I had already made for the
  fabric stained glass window, and used tinsnips and heavy gloves to cut the shape. I designed the spear point to use one of the larger copper scraps, but I knew there wouldn’t be enough for the crown, plus we decided gold was more royal for the crown anyway.
I sketched the dragon face in chalk on the back side of the shield, finally getting it just right, then I started my first metalwork! I had my mom’s old woodcarving chisels, a  rubber mallet, my big hammer, and two old throw rugs. I set up my station on the floor in front of the TV, but while I was pounding it was too loud to hear the TV anyway. 😉 Since I wanted the dragon face to stick out from the rest of the shield, I pounded the outline of everything from the backside first. The main rug was to protect my floor, but the other rug was folded
  up inside the shield as plenty of cushion so I could actually bend the copper sheeting into shape. After a lot of pounding and bending, the edge was curved for safety, and you could tell from the front side it was supposed to be a dragon…and after a lot more trial & error pounding from both sides depending on the desired shape, it was a lot more lifelike, even with scale texture from a curved chisel!
 Since this is the Verdigris family and I was working with real copper, of course I tried my own real verdigris solution to accent the dragon on the shield. A paste of vinegar, salt & flour was the recipe I found online, and scrubbing with citrus peel first to make sure the copper was perfectly
  clean of any grime or skin oils, so I tried it. Once I got it to the proper paste texture that wouldn’t dribble into areas I didn’t want, it worked great, getting more intense over time, and I added more paste in areas like the eyes and the wings for more color there. I used more citrus peel & a nylon scrubber to fade areas away for shading effects. I like how it came out, but unfortunately it hid all the metal shaping I
  had done. I could have done flat verdigris for all you can tell…lesson learned! Also, the verdigris was fine for about six months from summer through Halloween and to Christmas, but after Christmas I noticed the thickest sections started flaking away, leaving the copper fine behind it.
  Obviously the flour was what acquired the patina from reacting with the acid and the raw copper. To keep your verdigris intact you should probably use a clear sealer to protect it.
 Not only did I have to hold the shield for the portrait, but it was to hang over the fireplace mantel as decor, so I added a scrap leather strap in back at an angle. Proper battle shields usually have a vertical strap for the forearm, but that wouldn’t hang on a hook on the wall, hence enough angle for both uses. I carefully chose some places to pierce holes that wouldn’t detract from the design, used some thinner strips of matching leather as lacing through the holes so
  only a small brown stitch could be seen from the front, then a chunk of scrap brown leather strap laced in back. The shield was ready for battle, or at least a battle portrait. 😉
I cut the spear point from the largest scrap of sheet copper, and used a long closet rod dowel from my wood stash as the spear shaft. I thought a darker wood would look better against the copper, so I  stained the pole first, and I cut the notch in the top for the spear point to fit. Of course the sheet copper was too thin for a real spear point, but for looks it was fine.
 I’m fond of Sculpey clay that I can bake in my oven, but since I had to form the dragon claw serpentine tail on the pole, there was no way I could bake it. I found some air-drying clay instead and hoped that would work okay. For the most part it worked great, only a little shrinkage factor made one section crack so I had to repair it. I sculpted nice knobbly finger claws so the spear point was the index finger claw, and used a smaller curved woodcarving chisel twice for each scale all the way down to the tail. I really like the look, but those scales took a long time…I almost didn’t finish before the clay was already hardening too much!
 After the clay was dry and I masked the pole with tape, I used copper gilding paint over the entire dragon claw, making sure to get into all the texture. After the copper was dry, I used a thin wash of brown acrylic paint to give it some age. The gilding paint stays tacky, so even after the brown wash it still needed a coat of clear acrylic matte sealer. I made the mistake of trying a non-acrylic spray sealer once over this gilding paint and it ruined the color completely! Modge Podge works great so I stick to using that. Finally after several weeks the spear & shield were ready to go, but there was still the crown…
 I was actually working on these projects concurrently, since I could only pound the copper for so long until my hands were too tired to grip properly, so I would take a break or move to doing something else. Each coat of verdigris paste took overnight to show what it would turn into, so the clay work was happening while that was taking its time. I cut the crown from an aluminum ventilation pipe back when I was cutting the copper
  into the shield and spear point. I could bend the bottom edge where the vent was supposed to nest inside the next pipe, and that was good for where it sat on my head, but the aluminum was too brittle to bend all the cut edges for safety. I could fit the entire crown in my oven so I used Sculpey baked directly onto the metal for safe & decorative rope edges.
 Knowing how much room I had on the crown, I sculpted the dragon medallion from Sculpey with the three horns as separate pieces, and made a silicon putty mold of the dragon so I could make a matching medallion for the
  Pumpkin Queen’s crown. I hot-glued the dragon to the crown along with some plastic pearls by the yard for some extra detail.
I spray painted everything gold so there would be no brushstrokes from the gilding paint, and I painted the dragon medallion for the Pumpkin Queen’s crown at the same time.  Another bonus is the gold spray paint doesn’t need final sealing like the gilding paint does, but it doesn’t shine quite as nicely either. To bring out the detail in the
  dragon especially, I used the same brown acrylic wash as I used on the spear. Finally the crown was ready, too, so the First Queen was ready for filming her portrait!
After the First Queen’s portrait was filmed, I could continue ghostifying her. Paint would risk permanent damage to the leather bodice, and that sucker was $200 so I didn’t want to ruin it forever! I started by covering the bodice and changing the laces to white cord. I had chosen the fabric carefully, wanting something translucent enough to see the dragon design, but still white enough to be ghostly, but boy this fabric  frayed a lot! I was also very careful with the seams, cutting them so they would fold to the inside out of view. Once all the pieces were covered, including handstitching the openings closed around the leather pieces, I cut tiny holes, not protecting them from fraying, but poking the white cord through the small holes sometimes caught threads, making them pull & puckering the fabric. Once it was all intact it looked fine, thank goodness!
 These old boots were already on their last legs, with the surface flaking apart and disintegrating, so I decided I could whitewash them without doing any further harm. I used thinned acrylic paint to let the texture show through just pale, not stark white. If I need laceup brown boots for future costumes, I will have to invest, but the white paint is staying intact so far so at least I have ghost boots now!
 For the ghost dress, I bought about 5 yards of sheer white crinkled fabric that draped well. The dress is full length with long sleeves, but I made separate tattered cuffs so I could remove the cuffs when I needed to perform hostess duties! I used the same white cord as the bodice laces inside casings for the neckline and the sleeves so they can be altered to fit easier than using elastic (plus it’s more authentic). Yes, it’s very sheer up top, but the leather bodice was plenty opaque so I wasn’t concerned. For more layers of tatters, I made a separate two-tiered tie-waist skirt to wear over the dress. I didn’t shred the tatters until everything was in place on the dress form so I could see what should hang where. I sat on the floor shredding for quite awhile until the tatters were to my taste. 😉
 I knew I could use some post-processing to fade the colors, but since the majority of the costume was already very pale, the color contrast wouldn’t match, so since I didn’t want to permanently alter the crown or spear, I dusted them liberally with talcum powder. That gave them a pale look, but you need to re-apply after a lot of handling. Since the tall tower window could only be so large because of the 24″ monitor we used for display, we decided against holding the shield so I could point at possible threats and have the tatters fluttering in the ghostly breeze. For filming, we used a large black backdrop that continued onto the grass in my backyard, two clamp lights on tall stands to light the subject without lighting the backdrop, and my tall fan oscillating on low to create the breeze. This is a screencap from the final ghost footage, not the raw video, but I love how it turned out!
 At least that much of my costume was done before September even began, but the crowning glory was constructed last! One major drawback to the higher-density fiber-optic fabric is that there were more battery packs & LEDs required vs. the fabric width, and each battery pack was for 3 AAA batteries. Not only was that weight, but they were black battery packs and bright spots of LEDs I needed to hide at the neck seam and the bottom hem. Thankfully my partner in crime was not only my ghost writer, but he also has an electrical engineering degree & offered to rewire my fabric…how awesome is that!!! The power requirements for 6hrs straight use were too high to use any tiny coin batteries, but getting 13 packs down to 2 was so much easier to manage! He thought about wiring the 2 packs together, but that would require a wire down the full length of the cloak, and I thought it might be useful for the bottom pack to stay off, giving a fade-out effect. Each extra power supply had to be
  cut out and a T junction inserted to wire the bundles inline together. The final design was one battery pack neck center back so it was hidden inside the hood, and the other at the bottom hem corner.
After everything was resoldered, I wrapped the LED bundles as tightly as possible with bubble wrap, but you cannot bend the fibers of course or they will break. I thought the bubble wrap would provide some cushioning against bending the fibers too far, plus there was plenty that came in the shipping box. You can see how the LEDs at each
 end of the fabric panel are really bright, and those spots of light detract from the mysterious sparkle of the panels, so they needed to be covered. Around the neck I needed to roll the extra hood fabric over the seam anyway, plus there were so many LEDs closer together it looked more like a brighter glow than separate lights. But the bottom seam was bright spots that really bugged me. White felt wasn’t opaque enough, nor even white fake fur scraps I had, so
  I resorted to some large wired brocade ribbon I had, painted it white with fabric paint so it would still bend, and folded that over the hem. That STILL wasn’t opaque enough, so I added some layers of tatters from the dress scraps too in hope of a fading effect. The final result still
  looks like spots of light to me around the bottom, but such is life.
At least the ribbon folded over nicely to create a corner pocket that hid the power supply very well. I added a matching ribbon flap that tucked in around the top of the power supply and that kept everything in place just fine. Weight wasn’t an issue since it was the bottom hem anyway.
 I was concerned about catching both sides of the ribbon while concealing all the wires & fibers, so I hand-sewed around all the LED bundles. The only seam I felt safe using my machine was the back vertical seem of the hood, but it made me laugh sewing on glowing fabric! 😉
 Sadly the weight of the cloak & battery packs was just a little too much for the filigree clasp I bought, since it broke the 2nd time I tried it on, AFTER I had painstakingly hand-sewed it on of course! I used some of the same white cord from the dress & bodice lacing, tied it into the ends of the clasps, and ended up with a tie closure that lasted through all the wearings so far, thank goodness.
The wig was the same as my 2003 ghost just braided, and I added plain white makeup so I looked pale instead of a clown, then I was ready for the party! Of course I had to pose with my Tower Ghost partner behind me!


Everyone at the party was thrilled with my costume so I couldn’t help breaking character & smiling! I am so glad it turned out this well, and now I can have fun thinking up future ghosts who can wear the same glowing cloak! 😉
(even more photos continue below…)
Of the six ghosts for Halloween 2012, there were two each of three different display techniques, so I might as well group them by technique. The easiest displays were the plain video screens showing the Watery Wraith in the wishing well and the Tower Ghost in the tallest tower, so I’ll start with them…
 The Watery Wraith Haunting the Well was an easy display setup with just a digital photo frame sitting inside the well, but quite challenging to film the ghost footage! I have a small wooden garden wishing well that has been in my backyard since before I bought my house. I’ve always wanted to use it for Halloween but had no good ideas until we needed ghost haunting locations. Why not have it haunted by someone wrongly drowned as a witch? This was the only ghost who was filmed before
  filming her portrait, since this was my ghost dress from 2003 that was already in tatters, also the Ghost In Chains dress from my first video ghost in 2011. The Watery Wraith was also the very first ghost filmed for 2012, so we learned lessons that helped as we went along.
In the brainstorming emails from last spring, my mom offered that we could film me “drowning” in their backyard swimming pool 3 hours away from me, and my annual Halloween shopping weekend friend Tash made a special trip to be there to help with filming! I sewed a bunch of black weedblocker fabric strips together to make a large  black backdrop 10x12ft, with a casing on one end for a 10ft PVC as a curtain rod so it could be used for filming other ghosts too, but I didn’t realize it should have been even larger to make sure there was enough background all around me.
For the proper perspective of looking down into the well, the camera needed to be directly above me, so I brought one of my microphone stands with an adjustable boom arm, and lashed a mini tripod to it to hold the camcorder. My ghost writer’s idea was to film under the surface of the water so we could put a layer of actual water over the image for realism, but we didn’t have a wide-angle lens or a deep enough pool to get my entire body in field that way, so the camera was about 5 ft above water level  about about 4ft out over the water from the pool edge, which was far enough we needed some exercise weights on the stand base to counterbalance the camera and boom arm. This setup showed the surface ripples in the water, which was perfect when shown on the digital photo frame, without any actual water required over the surface for the illusion to work.
We started in the deep end so I could actually pretend to drown. Getting the lightweight black fabric to stay on the bottom was tricky, since it wanted to float, and  still needed rocks to hold the edges down, and it still wanted to float up in the middle when I moved above it. Treading water in a waterlogged dress while trying to look like you are drowning, all while being totally blind without contacts or glasses and only able to hear directions when your ears happened to be above water, was quite a challenge! I ended up sputtering & coughing up a bunch of water after each take. 😉 Since the chain was hollow plastic, it kept floating up around me, so I looped it through my big toes to try to pull it down, making it extra hard to tread water. You can see some “behind the scenes” footage here. We
  started filming as soon as the direct sunlight was gone, and we tried artificial lighting but the best lighting was natural dusk that made the white dress & hair glow against the black background, so we were done before sunset.
After reviewing the footage we did get, we decided I could use the following evening moving the whole setup to where I could stand, thinking I should have more control without as much “actual” drowning & sputtering (so much for that plan, as you can see here), plus the backdrop being immediately under my feet should help maximize the black area behind my floating arms. Good plan, except that I had problems with too much floating! I had to balance exercise weights on my thighs to keep my butt  from popping up in back when I’d try my best to sink! After a bunch of giggle fits, I finally got the hang of it, plus getting the proper hand placement to cover wig edges when the hair would float as I sank, and slyly pulling the chain down with me, so we got enough usable footage to be worth the second setup. The wig & dress dried out fine, and I was able to handstitch all the tatters into the hems and add bright gold trim to film her portrait the following week.
I knew the actual audio wouldn’t be very usable except maybe some of the end sinking bubbles, so I set the camcorder on the pool edge and filmed a bunch of audio in the pool, gurgling, bubbling, and rattling some chains against an old metal anchor my  dad had in the garage. I used those during editing to add enough sound to attract attention for passersby to lean over and look into the well. The volume on the
  digital photo frame was pretty good, even though I had the edges covered with black felt to hide the rectangular display area.
Since the wishing well isn’t very deep, I helped the illusion of depth by spray-painting the insides black, fading from blackest at the bottom up toward the edge. In daylight everything was obvious, but outside in the dark it was quite believable. Since the well has a roof, I had to prop the digital photo frame at an angle using the power supply so  it wouldn’t glare at the viewing angle. The kids really liked this one because since it was perfectly at their height, they could watch it for quite awhile. 🙂
What could improve the effect would be a smaller video on a larger screen with a bottomless tube you could set over the screen so you don’t see any rectangular display. However, you would have to disguise the portion of the screen that sticks out around the bottom of the tube, and you wouldn’t have the ability to adjust the viewing angle if you need to peek in under a roof. You can try it yourself by purchasing the Watery Wraith video including sound, from EerieElegance.com!
I’m sure you recognize the Tower Ghost as my Glowing Ghostly Guardian costume, which you already know was a lot of work through the summer to make all the accessories like the spear, shield, and crown. Since I knew I was wearing the costume as a ghost for my party, we filmed Queen Brittahilde’s portrait first in early September, then I added the sheer white fabric to the leather bodice and talcum powder to the crown & spear for filming the ghost. I had made the ghost chemise and skirt earlier in the summer to be ready, and I braided the white wig to match when I  braided the copper wig for the portrait. By the time we filmed this ghost, we had enough practice with the backyard stage setup, hanging the black backdrop on the movie screen trellis, weighting down the corners on the grass, and lighting from each side to avoid lighting the background. Having no light hit the background improved the auto-contrast in the camera, and made the black match the absolute black I was able to generate by masking in Final Cut Pro, so it worked great.
 This was easier filming than many of the 2012 ghosts, since standing in the tower, she only had so far she could move or she would be out of view. We knew we wouldn’t see her legs in the tower display, but I wanted to film the full body since you never know how we might want to use the footage in the future, or who else might want a full stature warrior queen ghost. 😉 My big fan was running to give some flutter movement to all my translucent tatters on the sleeves and skirt. We came up with a way to change hands with the spear that looked cool, and I imagined looking at the sidewalk and the front pathway, scrutinizing everyone coming near the castle, pointing when I saw someone extra suspicious.
My partner in crime had a spare 24″ computer monitor that conveniently rotated vertically on its stand. He also had two sturdy collapsible workbenches that stacked, so I designed the tall tower around the setup, aiming the arched balcony “door” to fit  exactly with the monitor. When we hauled everything up to my roof 2 days before the party, we realized my tower roof stabilization pole could snap into the back of the monitor stand and fit into one of the holes of the workbench. That was fantastically stable (which was a huge relief since none of that was my own equipment!), but it made the tower pieces not fit as planned, since the balcony opening had to be as close to the monitor screen as possible for the illusion to work. You could only see the offset tower walls from the far sides though so I didn’t worry about it. There was a bit of glare from the monitor surface and blue glow from the “black” areas of the video, but adding one layer of sheer black scrim taped taut over the monitor screen worked perfectly. It really looked like she was standing in the tower, looking down at everyone below, even looked like the spear came outside in front of the window in spots!
 As for the video, if you read the Seven Moving Portraits post, you know I was scrounging for media players that would run video, and had a few iDevices of different generations at my disposal that were easy to hide, but getting them to work with the various cables I was able to acquire was a challenge. We had the space inside the tower to use a DVD player, but since my iPad was available and we did have a Dock to RCA cable, that worked fine with the iPad sitting on the lower workbench under the monitor. The trick was that none of the iDevices allow looping video (still annoying!), so I had to encode a 6 hour mp4 file to load onto my iPad, and was very glad that the battery lasted fine. I obviously didn’t leave the iPad out overnight, but since the foam tower structure provided cover from average overnight moisture, we were okay with leaving the rest of the setup through Halloween night.
 Of course Halloween day there was enough breeze to start tower failure…aack! Even though I had used monofilament to lash all the foam pieces to each other and bricks to keep them in place at the bottom, I had to reset everything quickly before any trick-or-treaters showed up. All the trick-or-treaters loved all my ghosts, and luckily they were gone by the time it started drizzling. I couldn’t manage the heavy monitor by myself on the ladder so I brought a trash bag up and covered it tightly to keep it safe, until its owner could come over and help me get all the equipment off the roof and dismantle the castle walls. You can see both the Tower Ghost and Swashbuckler Sally in the middle tower in this video.
Even though there is no audio track, the Tower Ghost is one of the best values, since you get 21 minutes of continuous footage of an ancient tattered medieval warrior queen silently watching and pointing toward the living, twirling her spear periodically from side to side. Buy your own copy on EerieElegance.com for only $5, no shipping!
Of course these were the “easy” ghosts…they get more complicated as we go along! Stay tuned for the Secrets of Swashbuckler Sally & the Pumpkin Queen…
Onward to pirates & pumpkins! Both Swashbuckler Sally and the Pumpkin Queen were rear projected onto screens, both using compact specialty-use UltraProjectors, what you might think would be a simple technique, but there were some execution surprises both good and bad…
This Renaissance era Pumpkin Queen approaches while menacingly sharpening a large knife, raising it as though to attack as she moves even closer, then she stabs and smiles while carving a pumpkin into a jack o’lantern. This 30-second clip for sale on Eerie Elegance was specifically designed to interact life-size with a large physical pumpkin on the ground in front of the image projected from the rear onto a scrim, but you could also use a video screen or reflected Pepper’s Ghost illusion.
 Since I had to get up sooo early to film her portrait with the live pumpkin blossoms before they closed up for the day, we filmed her ghost a different night. I used my dad’s antique knife sharpener since it looked authentic and made an ominous spooky sound, walking carefully towards the camera over the black backdrop on the grass, gently letting the sharpener hand to my side as I walked, but when I raised the knife, we could not get it to catch the side lights that were carefully positioned to light me without lighting the black backdrop. My director/cinematographer lashed an LED headlamp to the end of the long piece of scrap PVC, and aimed that while I was walking and twisting the knife to catch the light. It took several takes past a lot of giggling due to his positioning of the pole and my “pumpkin shimmy” that was rated not for kids, but we finally got a few good takes! No physical alterations to this costume to make it ghostly, just faded the contrast and colors in post-production in Final Cut Pro, including adding the stabbing pumpkin sounds I recorded by stabbing a real pumpkin with that same knife used in filming. 🙂


 the bulb, so we had to place it over 10 feet away from the gate to get the Pumpkin Queen anywhere near life size. You could see her in person so we thought it would work okay, but she didn’t gather as much attention as the brighter Gate Ghost the year before, and I couldn’t get her to show up on video at all, only at the highest manual ISO setting on my good still camera. The lesson learned here is the Ultra-Projector is too small and too dim for life-size full-body people projections, but we knew we were pushing its limits.
 It was very nice that the UltraProjector was lightweight enough for a normal tripod, only needed a power cord (and speaker if using sound), and it was already black so it was easy to hide, but despite killing myself the last two weeks before my party with various video protocols and converter software, I could never get the audio to stay in the file after conversion through the proprietary UltaProjector software, so no one could hear the ominous knife-sharpening or the thuds as she started carving the pumpkin. Thankfully this summer I have been able to work with Richard of UltraProjector.com and figure out the right format and encoding using other video converters for files to work with sound on my two UltraProjectors, so I’m
  extremely glad that won’t be a problem in the future. He has new models out this year that can accept many more video formats, so that will be even less hassle for new buyers. All of this means the gate location will not use an UltraProjector in the future, but we do have other locations where the UltraProjector should work fine.
Since the Pumpkin Queen was designed to “interact” with a physical pumpkin in front, you need to supply that yourself, but that could be as easy as setting a real pumpkin on a stand in front of your TV or a digital photo frame while it displays the ghost. She’s definitely a Halloween spirit giving chills until the punchline, and you can own a copy from EerieElegance.com!
This 18th-century pirate Swashbuckler Sally is brandishing her sword fighting an unseen foe from side to side. This 3-minute clip for sale on Eerie Elegance is perfect for projectors, video screens, or even reflected Pepper’s Ghost illusions. At Castle Brittahytta, Sally fought bravely all night long back and forth between three windows in the center tower. (Apologies for the video glitch when zooming in.)
Before you can project a ghost, you have to film the video. Sarina’s portrait and Sally’s ghost were filmed the same very warm day, and boy that’s a lot of hot plastic hair to wear! Since it was difficult to see her hair, hair, boots, lapels & cuffs against the black ghost filming backdrop, I used talcum powder to dust those to  be a lighter gray. This worked pretty well as a non-destructive alteration technique, since I was able to wash the talcum powder off afterwards. To make her more ghostly, I altered the contrast and saturation in Final Cut Pro.
This one rivaled the Watery Wraith for filming hassle, since it was high summer almost 100F that day, barely cooling down to the high 70s after dark, I had to wear 4 layers of clothing, long hot wig, giant hat, socks and boots, AND jump around brandishing my weenie plastic sword, hopefully keeping proper fencing posture (golly that coat was heavy to hold up my arm for so long), all while trying not to scoot the black backdrop out of position on the grass…whew! I weighed myself the next day & had actually lost 2 lbs of sweat! After my director had been chiding me for my sagging posture and asked me to try an ill-fated spin,  I challenged him to try it himself! His feet got stuck really quickly, and he was in much more comfortable clothing and no wig or hat. 😉 At least we got plenty of usable footage for all that effort!
We were already running out of project time so we decided not to bother with any sword sounds or a speaker. Just as well since this was another UltraProjector and I didn’t get my audio issues worked out until this summer (see above). I have added sword swooshes and clangs for the version for sale, and she’ll be back in the tower for 2014 with speakers this time around.
My original plan was to aim the projector so it would reach across all 4 windows, but my cohort thought the different focus ranges would be problematic, so he came up with  a clever solution. We placed a mirror held in position by bricks at an angle in the space between the front two windows such that the mirror reflected into a side window without blocking the image from the front two windows. When the ghost moved across the projected field and hit the mirror, she jumped to the side window. Since she was jumping around and disappearing a lot, this worked really well not knowing where she would appear next! This video (or click the photo) shows the rear view in action to be completely clear.
 Knowing how the UltraProjectors are not very bright, we were worried the huge streetlight by my driveway would wash out the ghost, but I was very pleasantly surprised that not only was the streetlight not a problem, but the ghost was plenty visible even before full darkness! The windows were the same gray cotton sheet as the gate, taped & stapled in back to the foam. Gray was perfect since it was dark enough to look like empty windows in daylight but not so dark as to dull the projection. Since the UltraProjector was aimed perfectly at the mirror and up on my roof out of easy reach, I left it in place from the night before my party through Halloween night just fine. Howling wind and rain might be trouble but the weather-resistant construction is a great feature of the UltraProjector, and the mini-tripod included with purchase worked great for this setup. Now you have two real-world detailed examples in case you’re in the market for an UltraProjector yourself. 😉
As I remind you that you can purchase Swashbuckler Sally complete with audio from the Eerie Elegance website to use as a projected or reflected ghost anywhere in your own haunt, I will also leave you with a video of Castle Brittahytta showing the Tower Ghost as well as Swashbuckler Sally in the center tower.
Now that you’ve learned how to display these ghosts, you will finally be ready for the Pepper’s Ghosts coming soon! Stay tuned for the secrets of Merry Madam Mead & the Phantom of the Pipes!
Since my parties are in tight quarters with guests roaming around at will, I never had a good location for a Pepper’s Ghost illusion. You need double the space to hide the original item that is being reflected into your final display, plus the illusion only works from a controlled viewing angle. I have always wanted to do a Pepper’s Ghost, and finally for Halloween 2012 I not only had the perfect concept and location for two Peppers, but also enthusiastic help!
The smaller ghost in the bottle of Merry Madam Mead should have been the easy one, but it ended up less successful because of bottle shape and ambient lighting. We will refine that one for 2014, but the Phantom of the Pipes inside my shed was called “Disney quality” by one of my guests! I do admit that of all six spirits from Halloween 2012, the Phantom of the Pipes was my favorite!
This Renaissance era Merry Madam Mead keeps giggling while pouring herself even more mead when it is obvious she has already imbibed plenty. Show this 2-minute clip reflected inside a bottle or jar in your bar to add some humor to your haunt. Perfect  for projectors, video screens, and especially reflected Pepper’s Ghost illusions. You are welcome to edit after purchase for your personal use as long as it is not distributed.
Merry Madam Mead was the first ghost we filmed, in the same exact outfit after filming her portrait inside, so we had not yet refined the double front lighting technique. With only direct front lighting, it lighted the black backdrop behind too much, so the best I could do in editing was a large fuzzy halo around her. This large halo also made it difficult to see any detail after being reflected plus in ambient lighting. Since it wasn’t a difficult filming setup, I might refilm this one with the better lighting setup for 2014, but I’ll need to borrow that wig again. 😉
The ghost in a bottle setup is simple: a video with audio looping on a digital photo frame placed flat facing up but hidden inside a fake book, reflecting into the bottle above through a thin piece of clear plastic cut to fit exactly inside the bottle at the correct angle to reflect to the viewer. The book is cut so the hole exactly matches the open bottle bottom, but the tower of books is intentionally tall so not many people were looking down on the bottle so they wouldn’t see the photo frame underneath. It was also placed in a corner so no one could really look at it from the side or behind.
 I had spent awhile cutting that plastic to shape so no glue would be required since glue or tape would be visible and affect the illusion. Somehow when we set it into final position the plastic was no longer at the correct viewing angle, so my cohort was trying his best last-minute cutting as guests were arriving. I also never saw the double reflection at the top curve of the bottle during my testing. I had searched all summer for a big bottle shape with open bottom and this was the best I found which still was not good enough. What really irks me is that I had a spigot jar where the bottom broke cleanly off back in 2007, saved it in my garage for a year, then finally got rid of it a few years ago when I couldn’t think of any use for it. Sadly it would have been absolutely perfect for this! I’m almost tempted to buy another straight-sided spigot jar and see if I can duplicate the clean break for 2014!
This 18th-century French style Phantom of the Pipes peers knowingly over her shoulder at the viewer while sadly playing her own spooky fugue-style composition on a physical pipe organ (not included in the footage). This was designed as a life-size Pepper’s Ghost illusion to interact with a physical pipe organ prop. You could display this reflected onto a piano or your own custom-built props, with the reflection generated from a video screen or a projector. The pipe organ fugue on the soundtrack  is an original composition by Britta Peterson. You are welcome to edit the video after purchase for your personal use as long as it is not distributed.
After the Gate Ghost was successful, my partner in crime said “what about next year?” and my first reply was “I’ve been wanting to try a Pepper’s ghost using my pipe organ inside my shed.” He was shocked I immediately jumped to that elaborate of a setup! Talk about a challenge! We used an old glass tabletop that we could move around to check reflection angles, and our first testing using my existing projectors showed that we needed a much shorter-throw projector, since even lengthening our stream by  bouncing it off a mirror in the back corner, we were still nowhere near life-size to sit at the pipe organ. Luckily a new Epson projector was available for just under $500 that was the perfect throw…whew! At that point we knew our setup, which you can see in the diagram. By shoving the pipe organ all the way to the wall
  and angling it for the keyboard and ghost hands to be visible, we could just barely put the image screen along the open door, large mirror in the corner, and projector in the other corner behind the pipe organ, with the reflective film at an angle but stopping before it would interrupt the projector beam reaching the mirror.
Since this ghost was playing the pipe organ, she needed music! I could have used some old pipe organ spooky standards, but I took this as an opportunity to compose a 3-part fugue, transforming the theme she plays on piano in her portrait into a haunting minor melody. I worked it out at my piano, but Garage Band didn’t have any good sounding pipe organs, so I connected my vintage Yamaha DX-7 keyboard to my MacBook Pro, and recorded each part live into separate tracks. It was really fun to write this kind of music again, and I’m glad not only did I really like the result, but even though during final testing it was running over & over to the point of annoying, I heard my cohort humming along, commenting “it’s kind of catchy,” so he liked it too! 🙂
 After we had the final music all ready and knew the final setup, we knew where to place the camera to film the ghost. We aimed for an average viewing height of 5 feet, hoping that would be midrange for both kids and adults. I covered the walls and ceiling of the shed plus the organ bench with black weedblocker fabric that stayed in place through the illusion, but the floor was old plywood that was fairly dark, so I left that uncovered. We knew we couldn’t get any image to be tall enough for feet up through the tall hair, so we blocked most of the skirt with the bench to lessen the ghost image area. For filming only, I also covered the pipe organ with black weedblocker fabric, then had to remember where the keys were while miming my playing! Since the costume includes a fancy white wig and is already pale lavender, I didn’t alter any of the costume, but I did brighten it during editing. We avoided too much halo so the detail would be more distinct. I definitely needed a director for this, since the back of a ghosts’
  head is pretty boring to watch, so we finally settled on peering over my shoulder periodically like “I know you’re watching” which turned out pretty spooky!
For the final setup, we purchased large heatshrink window insulation film for about $20, and I built a frame of 1x2s since thicker wood would have messed up the  angles, especially squeezing the door end where it needed to be. I spray painted the frame pieces black outside, but I had to assemble the frame inside the shed since the door opening isn’t large enough for the size frame we needed. To make the frame blend in with the floor I spray-painted with the frame base in place, fading the black from the frame out both sides to the normal floor color. That also made nice lines for knowing when the frame was in proper position. The heatshrink film is taped on first as stretched as you can, then you shrink with a normal hairdryer since a heat gun is too hot. We had read that
  after shrinking the cloudiness would go away, but there were still some places that remained fuzzy, and it collected lint & dust from static electricity. The problem is that once it was in place, there was very little room to access the ghost side of the film. I had just enough room to reach in from each side to light the battery candles on the pipe organ, but there was no way to wipe the dust off the ghost side of the film farther than my arm’s reach.
 Here is a still photo of the final setup “behind the curtain” side, and you can see how our angles made the image stretch wider than projected. I compensated for this by squishing the original footage by about 25% percent so she looked normal sitting at the pipe organ instead of extra wide. Sure wish I could do that in real life! 😉 I had the navy blue crushed velvet curtains in my Halloween
  decor stash, so that draped over a “rod” of scrap 1×2 sticking out at the top of the film frame to hide the projector glow and the mirror. Since peeking in through the doors you could turn to the right and see the entire “behind the curtain” view shown above, we fixed both doors in place using bricks and my big stone urns so the opening was narrow enough that not even kid-sized heads could squeeze through, but you could put your face right up to the opening and see the ghost perfectly.
 The point of all the candles was to see them through the ghost, and that worked really well. I arranged them in an aesthetically pleasing way and made sure not to block her face or hands. We were hoping the projection would be enough light for the keyboard but from 2 bounces and a reflection, it had lost so much light that we added an aimable & dimmable battery LED light aimed directly at the keyboard. That was the perfect lighting to see everything in the background without washing out the ghost projection. The only drawback was that we thought the sound was plenty loud during all our testing, but ambient party noise plus the small door opening caused some people to miss my favorite ghost! It is such close quarters that it was very difficult to take still photos to explain the full setup, so you can watch this video below to see a walkthrough explanation of the setup while the illusion was running.
Whew! Now you know how we made all six spirits for Halloween 2012! Hope this inspires you to host your own ghosts someday! 🙂
 Subscribe RSS

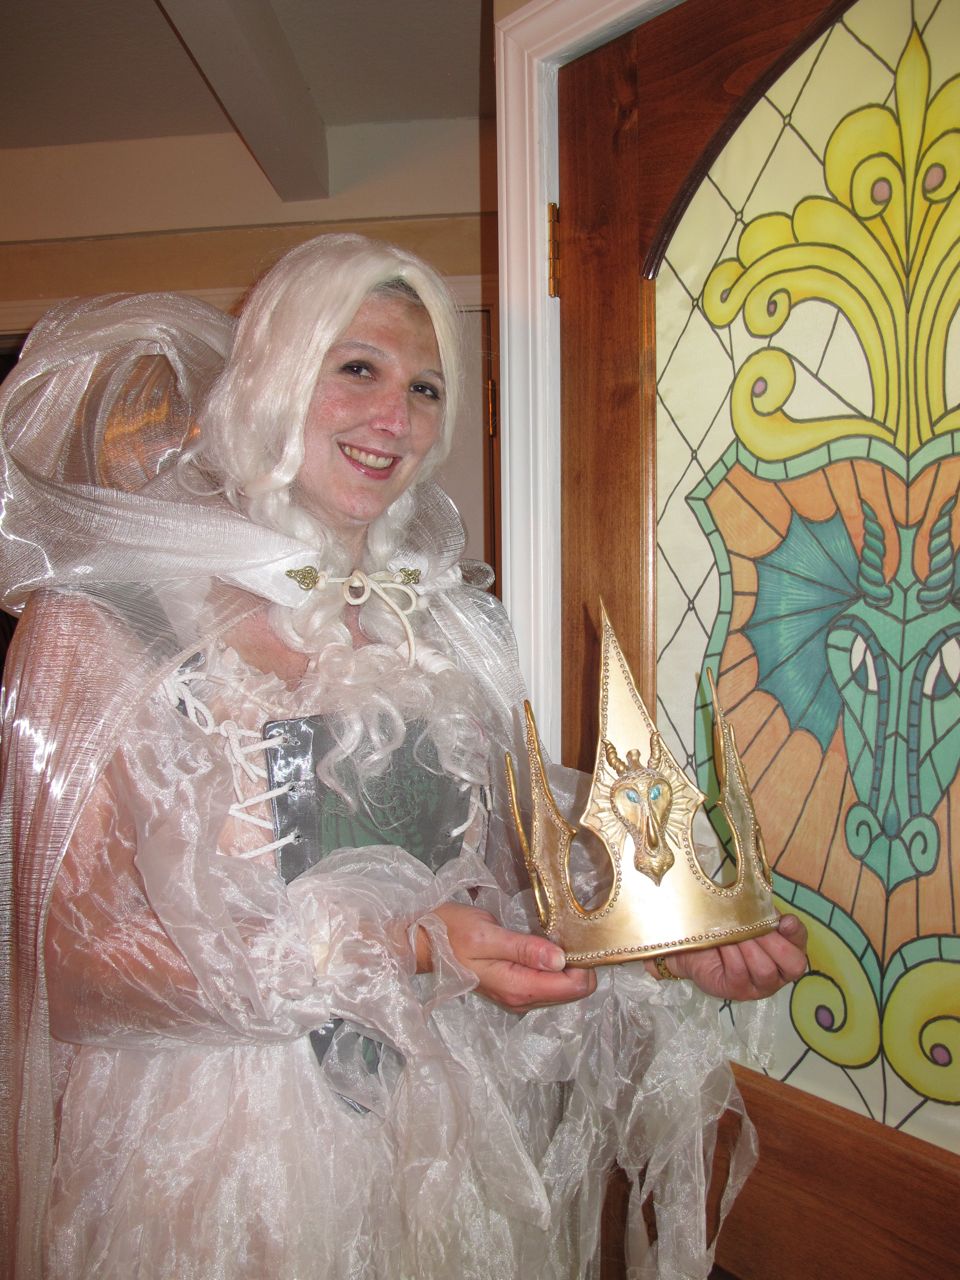