
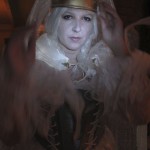
 Of course May is ending and I’m already well into plans for Halloween 2013, so it won’t surprise you that a year ago I was already working on my Halloween costume for 2012! I’ve already explained how it was last March & April when the ghosts & portraits were being worked out, and since I had splurged on a medieval style leather dragon bodice at the NorCal Renaissance Faire the previous fall, I figured I could be the First Queen in the family, the one who built Castle Brittahytta originally back in medieval times. This was the one completely new costume I made, and it was really two whole costumes since we filmed the portrait in full color, then filmed the ghost with different dress & wig, and I was the Glowing Ghostly Guardian live for the party, complete with glowing battery-powered fiber-optic hooded cloak!
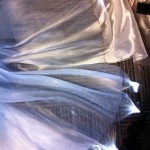
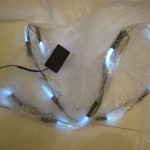
 I had seen the fiber-optic fabric a couple years ago online but it was soooo expensive and hard to figure out a project that would be worth all that. I saw it referenced again on another blog last spring and thought that could be awesome as a ghost cloak! Bonus is that a hooded cloak could go over ANY future costume as a glowing ghost, so it could be an investment vs. a single-wear costume! The rest of the costume didn’t cost much at all, but because of the leather bodice & the fiber-optic cloak, this was the single most expensive costume I have ever done. I discussed options with the sellers since I needed panel sizes they didn’t offer in stock to make my cloak, and the higher-density weave sounded much better for my transparent glowing look, but at the same time I bought 2 normal-density panels to make a shawl & clutch just for fun. When they finally arrived in mid-June, I was very glad I paid almost double since the normal-density fabric has a more fabric-like drape but looks stripey as you can see to the left. Since there are over double the plastic fibers in the other, it is much stiffer to work with, but the starry field effect was perfect! I was a bit embarrassed how expensive it was, but hey, I know other women who spend a bunch of money on shoes & purses which I never do, so I considered this 20 years of fancy clothing expense I had never spent! 😉 Glad everyone at the party agreed the effect was worth it!
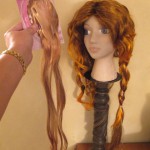
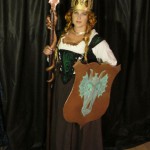
 A lot of the coordination for the portrait & ghost filming was how to ghostify pieces without being destructive, or at least film the portrait before any pieces would be altered to become ghostly. This was one where I had to film the portrait first so I could alter the bodice, boots & crown for wearing as the ghost for filming and the party. The portrait costume clothing was easy, since I wore my renfaire chemise & brown full-length skirt, my big lace-up 70s disco/Amazon Goddess/Valkyrie boots, and a gold choker from my stash. I scored the wig on Amazon for $14 of free points & braided some dollar store extensions into the wig to make it longer like the white wig I already had. What took so much work were the crown, spear & especially the shield!
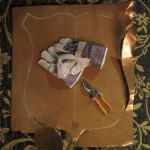
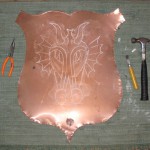
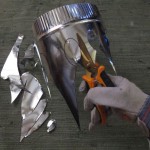
 My parents have had a small sheet of plain smooth copper up in their garage for over 10 years never using it, so after begging for years but this time with a specific use, they finally let me have it. I have no idea how much this would have cost to buy, but seeing how copper wiring is stolen from random places, it’s probably a lot! Very glad this was free! The sheet was the perfect size for a shield, so I made a paper template for perfect symmetry, using the same design I had already made for the
  fabric stained glass window, and used tinsnips and heavy gloves to cut the shape. I designed the spear point to use one of the larger copper scraps, but I knew there wouldn’t be enough for the crown, plus we decided gold was more royal for the crown anyway.
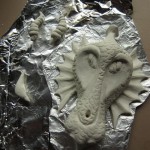
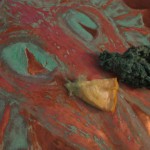
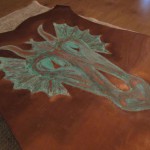
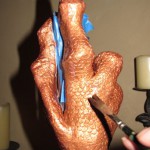
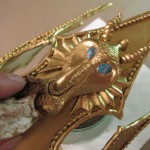
I sketched the dragon face in chalk on the back side of the shield, finally getting it just right, then I started my first metalwork! I had my mom’s old woodcarving chisels, a  rubber mallet, my big hammer, and two old throw rugs. I set up my station on the floor in front of the TV, but while I was pounding it was too loud to hear the TV anyway. 😉 Since I wanted the dragon face to stick out from the rest of the shield, I pounded the outline of everything from the backside first. The main rug was to protect my floor, but the other rug was folded
  up inside the shield as plenty of cushion so I could actually bend the copper sheeting into shape. After a lot of pounding and bending, the edge was curved for safety, and you could tell from the front side it was supposed to be a dragon…and after a lot more trial & error pounding from both sides depending on the desired shape, it was a lot more lifelike, even with scale texture from a curved chisel!
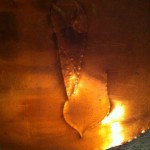
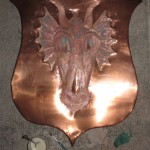
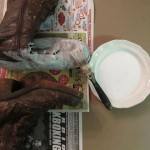
 Since this is the Verdigris family and I was working with real copper, of course I tried my own real verdigris solution to accent the dragon on the shield. A paste of vinegar, salt & flour was the recipe I found online, and scrubbing with citrus peel first to make sure the copper was perfectly
  clean of any grime or skin oils, so I tried it. Once I got it to the proper paste texture that wouldn’t dribble into areas I didn’t want, it worked great, getting more intense over time, and I added more paste in areas like the eyes and the wings for more color there. I used more citrus peel & a nylon scrubber to fade areas away for shading effects. I like how it came out, but unfortunately it hid all the metal shaping I
  had done. I could have done flat verdigris for all you can tell…lesson learned! Also, the verdigris was fine for about six months from summer through Halloween and to Christmas, but after Christmas I noticed the thickest sections started flaking away, leaving the copper fine behind it.
  Obviously the flour was what acquired the patina from reacting with the acid and the raw copper. To keep your verdigris intact you should probably use a clear sealer to protect it.
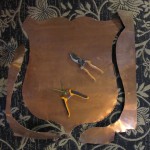
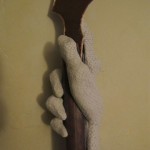
 Not only did I have to hold the shield for the portrait, but it was to hang over the fireplace mantel as decor, so I added a scrap leather strap in back at an angle. Proper battle shields usually have a vertical strap for the forearm, but that wouldn’t hang on a hook on the wall, hence enough angle for both uses. I carefully chose some places to pierce holes that wouldn’t detract from the design, used some thinner strips of matching leather as lacing through the holes so
  only a small brown stitch could be seen from the front, then a chunk of scrap brown leather strap laced in back. The shield was ready for battle, or at least a battle portrait. 😉
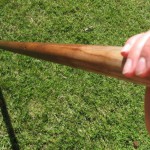
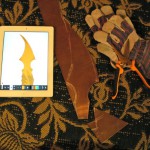
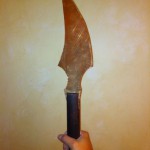
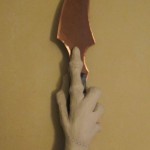
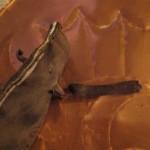
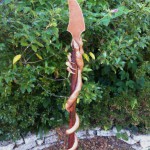
I cut the spear point from the largest scrap of sheet copper, and used a long closet rod dowel from my wood stash as the spear shaft. I thought a darker wood would look better against the copper, so I  stained the pole first, and I cut the notch in the top for the spear point to fit. Of course the sheet copper was too thin for a real spear point, but for looks it was fine.
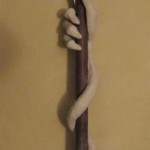
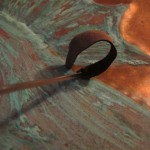
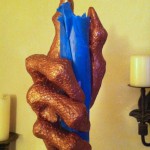
 I’m fond of Sculpey clay that I can bake in my oven, but since I had to form the dragon claw serpentine tail on the pole, there was no way I could bake it. I found some air-drying clay instead and hoped that would work okay. For the most part it worked great, only a little shrinkage factor made one section crack so I had to repair it. I sculpted nice knobbly finger claws so the spear point was the index finger claw, and used a smaller curved woodcarving chisel twice for each scale all the way down to the tail. I really like the look, but those scales took a long time…I almost didn’t finish before the clay was already hardening too much!
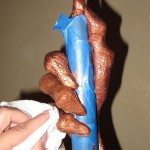
 After the clay was dry and I masked the pole with tape, I used copper gilding paint over the entire dragon claw, making sure to get into all the texture. After the copper was dry, I used a thin wash of brown acrylic paint to give it some age. The gilding paint stays tacky, so even after the brown wash it still needed a coat of clear acrylic matte sealer. I made the mistake of trying a non-acrylic spray sealer once over this gilding paint and it ruined the color completely! Modge Podge works great so I stick to using that. Finally after several weeks the spear & shield were ready to go, but there was still the crown…
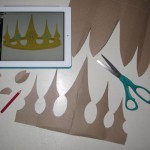
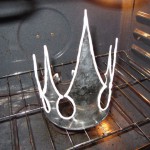
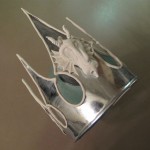
 I was actually working on these projects concurrently, since I could only pound the copper for so long until my hands were too tired to grip properly, so I would take a break or move to doing something else. Each coat of verdigris paste took overnight to show what it would turn into, so the clay work was happening while that was taking its time. I cut the crown from an aluminum ventilation pipe back when I was cutting the copper
  into the shield and spear point. I could bend the bottom edge where the vent was supposed to nest inside the next pipe, and that was good for where it sat on my head, but the aluminum was too brittle to bend all the cut edges for safety. I could fit the entire crown in my oven so I used Sculpey baked directly onto the metal for safe & decorative rope edges.
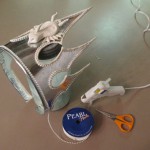
 Knowing how much room I had on the crown, I sculpted the dragon medallion from Sculpey with the three horns as separate pieces, and made a silicon putty mold of the dragon so I could make a matching medallion for the
  Pumpkin Queen’s crown. I hot-glued the dragon to the crown along with some plastic pearls by the yard for some extra detail.
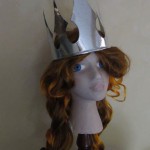
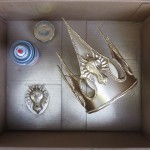
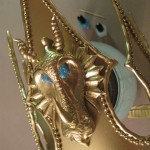
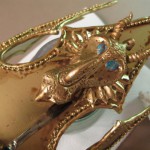
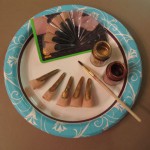
I spray painted everything gold so there would be no brushstrokes from the gilding paint, and I painted the dragon medallion for the Pumpkin Queen’s crown at the same time.  Another bonus is the gold spray paint doesn’t need final sealing like the gilding paint does, but it doesn’t shine quite as nicely either. To bring out the detail in the
  dragon especially, I used the same brown acrylic wash as I used on the spear. Finally the crown was ready, too, so the First Queen was ready for filming her portrait!
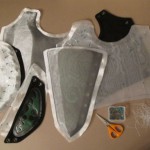
After the First Queen’s portrait was filmed, I could continue ghostifying her. Paint would risk permanent damage to the leather bodice, and that sucker was $200 so I didn’t want to ruin it forever! I started by covering the bodice and changing the laces to white cord. I had chosen the fabric carefully, wanting something translucent enough to see the dragon design, but still white enough to be ghostly, but boy this fabric  frayed a lot! I was also very careful with the seams, cutting them so they would fold to the inside out of view. Once all the pieces were covered, including handstitching the openings closed around the leather pieces, I cut tiny holes, not protecting them from fraying, but poking the white cord through the small holes sometimes caught threads, making them pull & puckering the fabric. Once it was all intact it looked fine, thank goodness!
 These old boots were already on their last legs, with the surface flaking apart and disintegrating, so I decided I could whitewash them without doing any further harm. I used thinned acrylic paint to let the texture show through just pale, not stark white. If I need laceup brown boots for future costumes, I will have to invest, but the white paint is staying intact so far so at least I have ghost boots now!
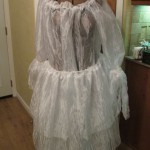
 For the ghost dress, I bought about 5 yards of sheer white crinkled fabric that draped well. The dress is full length with long sleeves, but I made separate tattered cuffs so I could remove the cuffs when I needed to perform hostess duties! I used the same white cord as the bodice laces inside casings for the neckline and the sleeves so they can be altered to fit easier than using elastic (plus it’s more authentic). Yes, it’s very sheer up top, but the leather bodice was plenty opaque so I wasn’t concerned. For more layers of tatters, I made a separate two-tiered tie-waist skirt to wear over the dress. I didn’t shred the tatters until everything was in place on the dress form so I could see what should hang where. I sat on the floor shredding for quite awhile until the tatters were to my taste. 😉
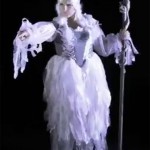
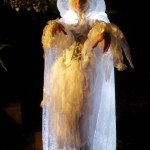
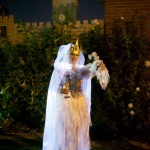
 I knew I could use some post-processing to fade the colors, but since the majority of the costume was already very pale, the color contrast wouldn’t match, so since I didn’t want to permanently alter the crown or spear, I dusted them liberally with talcum powder. That gave them a pale look, but you need to re-apply after a lot of handling. Since the tall tower window could only be so large because of the 24″ monitor we used for display, we decided against holding the shield so I could point at possible threats and have the tatters fluttering in the ghostly breeze. For filming, we used a large black backdrop that continued onto the grass in my backyard, two clamp lights on tall stands to light the subject without lighting the backdrop, and my tall fan oscillating on low to create the breeze. This is a screencap from the final ghost footage, not the raw video, but I love how it turned out!
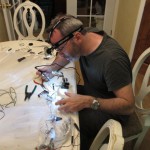
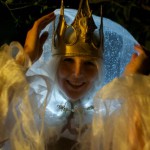
 At least that much of my costume was done before September even began, but the crowning glory was constructed last! One major drawback to the higher-density fiber-optic fabric is that there were more battery packs & LEDs required vs. the fabric width, and each battery pack was for 3 AAA batteries. Not only was that weight, but they were black battery packs and bright spots of LEDs I needed to hide at the neck seam and the bottom hem. Thankfully my partner in crime was not only my ghost writer, but he also has an electrical engineering degree & offered to rewire my fabric…how awesome is that!!! The power requirements for 6hrs straight use were too high to use any tiny coin batteries, but getting 13 packs down to 2 was so much easier to manage! He thought about wiring the 2 packs together, but that would require a wire down the full length of the cloak, and I thought it might be useful for the bottom pack to stay off, giving a fade-out effect. Each extra power supply had to be
  cut out and a T junction inserted to wire the bundles inline together. The final design was one battery pack neck center back so it was hidden inside the hood, and the other at the bottom hem corner.
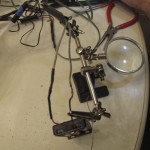
After everything was resoldered, I wrapped the LED bundles as tightly as possible with bubble wrap, but you cannot bend the fibers of course or they will break. I thought the bubble wrap would provide some cushioning against bending the fibers too far, plus there was plenty that came in the shipping box. You can see how the LEDs at each
 end of the fabric panel are really bright, and those spots of light detract from the mysterious sparkle of the panels, so they needed to be covered. Around the neck I needed to roll the extra hood fabric over the seam anyway, plus there were so many LEDs closer together it looked more like a brighter glow than separate lights. But the bottom seam was bright spots that really bugged me. White felt wasn’t opaque enough, nor even white fake fur scraps I had, so
  I resorted to some large wired brocade ribbon I had, painted it white with fabric paint so it would still bend, and folded that over the hem. That STILL wasn’t opaque enough, so I added some layers of tatters from the dress scraps too in hope of a fading effect. The final result still
  looks like spots of light to me around the bottom, but such is life.
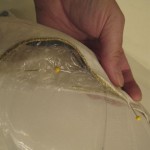
At least the ribbon folded over nicely to create a corner pocket that hid the power supply very well. I added a matching ribbon flap that tucked in around the top of the power supply and that kept everything in place just fine. Weight wasn’t an issue since it was the bottom hem anyway.
 I was concerned about catching both sides of the ribbon while concealing all the wires & fibers, so I hand-sewed around all the LED bundles. The only seam I felt safe using my machine was the back vertical seem of the hood, but it made me laugh sewing on glowing fabric! 😉
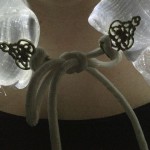
 Sadly the weight of the cloak & battery packs was just a little too much for the filigree clasp I bought, since it broke the 2nd time I tried it on, AFTER I had painstakingly hand-sewed it on of course! I used some of the same white cord from the dress & bodice lacing, tied it into the ends of the clasps, and ended up with a tie closure that lasted through all the wearings so far, thank goodness.
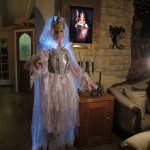
The wig was the same as my 2003 ghost just braided, and I added plain white makeup so I looked pale instead of a clown, then I was ready for the party! Of course I had to pose with my Tower Ghost partner behind me!


Everyone at the party was thrilled with my costume so I couldn’t help breaking character & smiling! I am so glad it turned out this well, and now I can have fun thinking up future ghosts who can wear the same glowing cloak! 😉
(even more photos continue below…)


 Subscribe RSS

Britta, You are so wonderfully creative and talented. I am awed!