I’ve healed enough from my recent eye surgery, finished my taxes, and made enough progress on my grandmother’s biography project that I am finally allowed to finish my costume for Elsa the Snow Queen! This time I’ll make updates as I make progress on each portion of her magical ice ensemble, including the ice dress, ice shoes, snowflake accessories, and sparkling snowflake cape…
First the easiest part of the ice ensemble…the mesh shirt. Sewing stretchy fabric is tricky, so I searched online a bit and scored an aqua mesh long-sleeved scoop-necked shirt on eBay for only $9, free shipping and no tax! 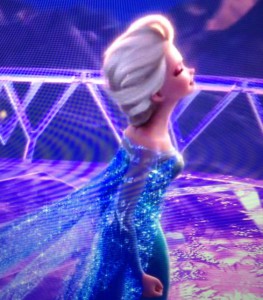 When it arrived it was the absolutely perfect shade of aqua to go with the aqua sparkle satin I had already bought. Not only was the color perfect, but even though it worried me that large was the largest they sold and I usually need XL, the sleeves were even plenty long for my super-long arms, and the shirt was well past the bottom of the bodice. I couldn’t have made one any better, definitely not for that price in fabric and time!
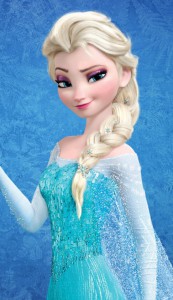 How do you make an “accurate” reproduction when every public image is slightly different? The dress is pretty consistent, but the designs on the mesh shirt change from image to image! In the song Let It Go, there are big chunky sections sparkling in the sunlight, but on the posters there are thinner and more delicate designs, and the Disney Parks costume is different from either of those, so I decided on my own interpretation, combining elements consistent to all those designs but with large enough sections to sparkle at a distance.
As you might have already seen with the fabric paint on the stretch velvet coronation shirt, painting on stretchy fabric can be tricky, so I wore the mesh shirt as I painted the clear iridescent glitter 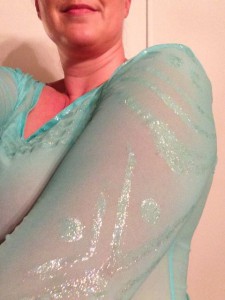 swirls and designs. Since I’m right-handed, I painted the left arm and across the front as far as I could reach on my right shoulder, taking about 45 minutes, then let it dry as I did other projects. When it was dry enough I put on the shirt backwards to paint the back and the other arm, so about an hour and a half painting time, plus about an hour more drying time for each side. The paint won’t glue the fabric to your skin permanently, it just peels off, and any paint residue will come off after a shower or two, even though some glitter might hang around for a while. 😉 Since this is stretchable fabric paint, when pulling it off my skin, it puckered and the mesh stretched out more than when I first put it on, but I’m hoping that a quick tumble in the medium-heat dryer
  recommended on the fabric paint bottle will shrink it back into shape, like a stretchy pair of jeans.
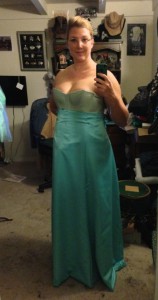
The basic dress is the reverse side of the coronation dress, and you can read the making of the coronation dress here, so that was already finished, but it needed the ice “shingles” added to the bodice. I didn’t want to use anything hard like sequins so it would still be comfortable to wear as the coronation dress when the ice was on the inside, so I decided on overlapping 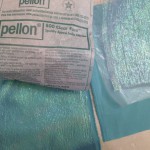 fabric rectangles. I couldn’t find any fabric the perfect color AND the correct glittering ice effect, so I laminated my own using clear double-adhesive iron-on interfacing between the same blue translucent iridescent fabric as the snowflake cape, and the same aqua glitter satin as the skirt.
Cutting all THOUSAND rectangles from the laminated fabric took over 2 hours! I used my trusty metal square to mark out 1.5″ and 1″ lengths vs. 3/4″ widths on the back side of the laminated 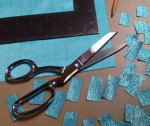 fabric, then cut them all out, leaving them in separate piles to keep track. I thought that two sizes of rectangles would be enough variety to stagger them to be random rectangles, but while gluing I realized I only really needed one size after all.
Because of the curve of the corset boning I couldn’t glue the bodice while flat, so I laced it tightly on my dress form so there would be support behind the 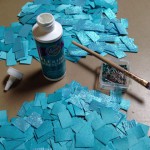 fabric and I could pin where necessary while the glue was drying. I propped the entire form up on a crate so I wouldn’t have to keep leaning over so low to reach the bottom of the bodice. I also set it up in my living room to use my drop-leaf table and see my TV. 😉 Since I was overlapping the shingles for the random rectangular effect, I started with the bottom row where the bodice meets the skirt. I originally sewed the skirt to the bodice from the aqua side, but then covered the raw seam edges with the bronze ribbon trim, so there were two lines of aqua stitching I needed to cover with
 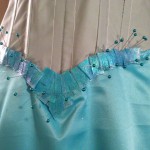 ice shingles. These required all my teal pins to anchor them so they would bend around to cover the stitching properly, so it took a couple hours just to get the single row around the entire bodice. It took overnight for this stretchable fabric glue to dry, but it dries clear and the sparkle shines through, so I gave it a whole coat of glue when it was done so I don’t bend any shingles when wearing it as the coronation dress.
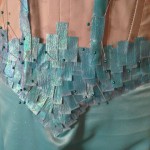 The next night in about 2 hours I got a lot more progress done since the glue usually holds without pins as long as it’s completely flat. I started overlapping by testing various methods of trying to be random and showing different sizes and shapes of rectangles, so here you can see a closeup view of the overlapping. I refined my technique as I went along. After I had my technique settled and
 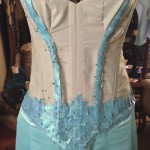 had handled the curves up to where the rest of the design would be only vertical, I went up the trickiest seams first since that boning pokes out making an angle so those are all folded over. I also covered between the lacing holes in back so all the under-layers were done before the next evening’s session.
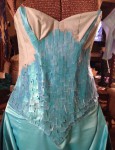 Several more hours gluing on the third evening got the front up to just under the bustline, but I was already almost out of stretchable fabric glue! I’ve always wanted to do a fancy mermaid costume with individual fabric scales, but now I’ve been thinking that this project might scratch my mermaid scales itch…at least for a few years? 😉
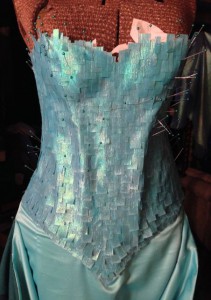 About four more hours gluing on evening four, I was getting closer to finishing the ice shingles, and getting tired of sticky fingers and glue everywhere. I had to stuff the bust with paper towels so the corset would be stretched properly for gluing. My dressform obviously isn’t as busty as I am! 😉 The plan for the top edge is to trim everything even from the other side so I know they won’t show when wearing the coronation dress. Even in decent shoes my feet hurt from standing up for 5 hours straight!
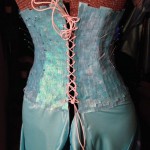 Finally on evening five, I finished the back too…whew! Each morning I have done some touchup gluing and pinning where certain shingles have curved up too much, but the majority stay flat enough I think it should work even worn as the inside of the coronation dress. I like the reflective texture of having some of the shingles not completely glued down, but we’ll have to see how it wears.
Now that the ice dress is ready to wear, stay tuned for the ice shoes and the snowflake cape! 🙂

 Subscribe RSS

Wow, that’s the mother of all decoupage projects! Looks fabulous! 😀
Hey! I absolutely just love how the dress turned out andI now have a much better idea on how to make my own ice dress for a youtube music video I’m planning to do with my friend. THANK YOU SOOOO MUCH FOR POSTING THIS!! 😉 🙂 ♥♡♥♡♥ X) x)
Where did you get your clear double-adhesive iron-on interfacing?
I found the clear interfacing at my local JoAnn Fabric store in the interfacing section. I just looked through all their stock until I found a thin weight that was double-adhesive. If you enlarge the photo, you can read the instruction paper that comes with it. They aren’t kidding when they say to leave an edge unsecured for easier peeling away the protective paper, since if you cut first then try to peel, often the adhesive peels off the fabric too.
Thanks. One more question. With the glue for the rectangles, was that straight on glue or was it a one to one ratio of glue and water?
It was straight out of the bottle, but I used Aleene’s Flexible Stretchable Fabric Glue which was was already thin but not runny. The bodice is definitely stiffer than just fabric but still flexible & stretchable. I had a couple rectangles fall off but only because my seatbelt rubbed them the wrong way while driving so long. Considering how many rectangles are on the bodice, I thought only losing a couple was pretty good! I reglued those and put extra glue over the top in those areas in hopes that doesn’t happen again.
Good luck!
This is beautiful! Did you do a coat of glue over the bodice once all of the shingles were done?
Thank you! I’m glad you like it! Yes, there is a top coat of the same flexible stretchable fabric glue, but it was as I went along, not one full coat at the very end. After I was able to take out the pins from the previous night’s work and started the next section, I went back and gave a topcoat to the previous night’s sections. The top coat wasn’t thick enough by itself to keep the ice shingles from curling without plenty of glue underneath and pins to prevent the edges from curling as the glue dried.
I love how the bodice turned out and I do think it will stay intact just fine, seeing how I have already worn it for 7 hours including 2 hours of driving with a seatbelt, but if I was doing it all over again, I would have machine sewn on the ice shingles on the base bodice fabric before finishing the boning stays…but since I was rushing the coronation dress, I had to finish the boning to wear that dress first. 🙂
I was wondering what glitter glue used and where you got it. I am in search of some for a frozen cape for granddaughters.
Thanks
Terry
For a whole cape, just get the big 4 fl oz bottle of Glitter Dimensional Fabric Paint in Diamond color by Tulip. I found it at one of my local Michaels craft stores but not another Michaels across town. I also found Scribbles 3D fabric paint in Crystal that was the same color, but I went through 3 of those small 1 fl oz bottles and still ran out. Get the big Tulip bottle if you can find it. 🙂 Good luck!
I was wondering how big the shirt that you got from ebay is. I neeed to make an elsa dress for my 14 year old and the only size they have on ebay is a Large. Thanks. And by the way the dress is incredible!
I bought the large expecting it to be super tight on me, but it has super long sleeves, it reaches past my rear, and is just stretchy enough to not be loose. I am 5’10” tall and 44″ bust with wide shoulders so that’s big! It’s very stretchy mesh so it might just be loose on your 14 year old. I had to cut the sleeves since they bunched up at my wrists and still covered my hands. I search for long-sleeved stretch shirt until I found that eBay listing, so you might be able to find something better?
Hi, did you make your own bodice or bought it?
I made the bodice from scratch using steel boning. Details are in the Making Queen Elsa of Arendelle post for the coronation outfit since I made that side of the dress first. My bodice is integrated with the skirt for better flow, since I hate the bottom bodice point sticking out from the skirt, as even the Disney Parks dress does. 😉
http://brittablvd.com/blog/2014/02/making-queen-elsa-of-arendelle/
How did you laminate this textured fabric with no bubbles? Would you be able to use a hot glue gun on these two fabrics? It is beautiful and thanks for sharing!
Glad you like it! There were some bubbles along the way where the interfacing didn’t stick as well, but the majority held together, enough for cutting all thousand ice shingles. Any ice shingles that separated, I used the same glue to glue the layers back together when I glued the shingle in place on the bodice. Hot glue works on the crinkle shimmer fabric but you would end up with blobs between your layers if you did that. Good luck!
This is beautiful. I love all the work you put into it! Great work!