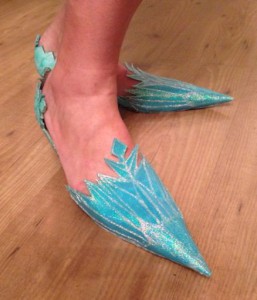
Elsa the Snow Queen doesn’t wear any necklace, earrings or bracelets, but she does have some cute sparkly snowflakes decorating her long full hair braid and hair tie, and her ice shoes are fabulous! Of course all of those accessories must be included in my version!
Elsa’s Hair
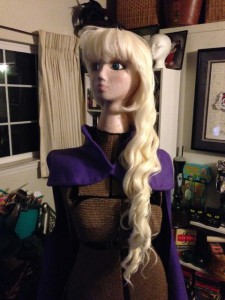 Of course my own hair isn’t anywhere as thick or long as Elsa’s hair, let alone the color! I do have a long vintage 60s hairpiece but it was my mom’s so not the platinum blonde hair that Elsa has. Since it also isn’t as thick as the movie, I used some free Amazon points to buy a styleable long pale platinum blonde wig, which was excellent quality especially for only $20. I have seen some cosplayers online wearing pure white wigs, but close scrutiny of any images as well as the movie shows it is definitely a very pale blonde, not pure white. Since so many others have done these costumes already, plus the official Disney park princess outfit, I wanted mine as accurate as possible, but I knew I’d have to take some license because I have real-world physics to deal with that the animators can ignore…like having her hairdo that is obviously only a twist magically turn into a long french braid when she takes it down. I styled it separately for the coronation twist for that costume, then restyled completely for the thick french braid and tousled, pushed-back bangs. Thank goodness this wig is good enough quality that I can brush it well and hair doesn’t fall out!
Snowflake Hair Jewelry
I like sparkly snowflake jewelry for Christmas anyway, so I decided to spend more free Amazon points on some earrings that I could also use for Elsa’s hair jewelry along her braid. I bought one set of a necklace with matching earrings, but when it arrived, there was an extra set of 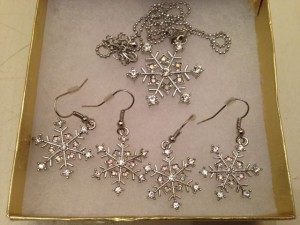 earrings! Voila, four snowflakes for the braid and one larger for the hair tie, all matching, and so much more sparkly than my decades-old snowflake earrings!
I found small spring clips with combs used for hair extensions, but I couldn’t get those to attach to the snowflakes and stay hidden in the hair. Even the small star spring clips I had couldn’t be hidden well enough. This wig is thick enough when braided that I think the earring fishhooks will stay well enough for general wear as long as tuck them in as far as I can. I might take them out for going on rides at Disneyland however. The pendant snowflake has a bail large enough to remove the chain easily, so I used a ribbon through the bail to use that as the hair tie snowflake. This jewelry set even already had small iridescent crystals in the design that matched the glitter paint I used!
Elsa’s Ice Shoes
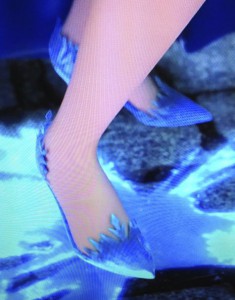 There are only about three shots of Elsa’s ice shoes in the movie (when I saw them in the movie, I said “Look at those SHOES!” and I’m not even a shoe girl!), but thankfully you can also see them in the large poster version online. Interestingly in the movie her shoes aren’t translucent but in the poster they are. That made things easier for me since I could use any original shoes and paint them. I decided on using these low-heeled white pumps my mom gave me for free, since they fit well so should be
 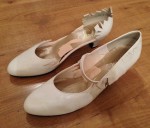 comfiest waking around Disneyland. 😉
First I sketched the design in pencil on one shoe, starting with the heel shape, making it as symmetrical as I could. Pencil didn’t show up very well and rubbed off while I was twisting the shoe around every which way while cutting, but I finally got one cut to shape. I left the bound edges intact in three places where the snowflake design was logical, and that helped keep the heel in its original shape. Once I was satisfied with the shape on one shoe, I sketched it mirror image onto the other shoe and kept cutting. These were sturdy shoes  and very difficult to cut, so my hands were really sore the next day after using my heavy-duty kitchen shears, box cutter, and lots of elbow grease!
These white shoes didn’t come far enough up the foot in the front section for the extra ice points so I needed to add material for those, but I cut the edges into the spikes and cut the long sides down almost to the sole, trying to leave enough intact to stay on my foot. Walking around worked okay as long as I didn’t bend my foot midstep like I normally walk, and I have to do the same thing with some of the heels I have. For Disneyland I will have a large bag like I 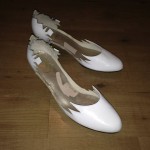 always do, and I think a change of shoes is a wise idea anyway just in case I need them.
I sealed all the cut edges of the shoes with flexible fabric glue so they wouldn’t fray but still move enough for comfortable wearing. I also was very careful not to get too much glue on the inside lining so it would still be soft against my bare feet.
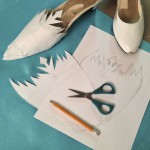 Thankfully I had leftovers of my aqua laminated fabric I used for the ice shingles that I could use for the shoes. First I sketched and cut a paper template to make sure I would have enough material to go around the toe, then since the original template was so scrunched from all the testing, I ironed it flat then traced onto fresh scratch paper. I hadn’t cut the shoes as similarly as I hoped, so they are not exact mirror images, so each foot had its own template.
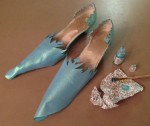 After tracing and cutting the shapes from the laminated fabric, I taped them in place as a trial run, which also showed me where I needed to paint the rest of the shoes. I used the same aqua opalescent fabric paint from the coronation shirt brushed onto the white shoes in a sheer coat for a paler base aqua color. Three sheer coats of the same paint was good enough to blend colors with the dress fabric, especially since I knew I would be adding the crystal iridescent glitter paint over the top.
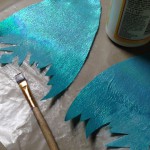 Next I set the fabric pieces flat on wax paper and used Modge Podge to seal the cut edges and stiffen the points. It took about 4 coats on both sides of the points before they would stand up by themselves, but I left the main toe fabric pliable to position properly when gluing onto the shoes.
Once the fabric pieces were stiff enough, I used strategically-placed tiny dabs of hot glue to place the points along the cut shoe edges and have the top of the shoe lie properly, then I eased the rest of the fabric around the toe, anchoring with a thin line of hot glue only along the edge of the sole. Since Elsa’s shoes are pointy, I eased the rest of the fabric into a cone that was in line with the original shoe for stability. The inside of the cone I let roll inside for 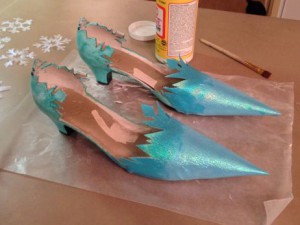 more stability, but I had to trim the outside edge to be along the bottom. I hotglued the outside edge in place, anchored the extra fabric under the bottom of the sole, then I was ready to get back to more Modge Podge.
I learned with my Ruby Slippers last year that the matte Modge Podge protects glitter and shine well without dulling the original sparkle or adding extra shine, so I knew it would be perfect for these shoes too. I saturated all the fabric that I added to the shoe to make sure it would stay on the shoe and seal all the edges against any fraying or wear. I concentrated first on anywhere that wouldn’t stick to the wax paper, which included under the 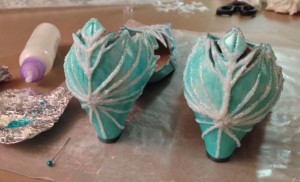 pointy toes since the toes naturally pointed up a little off the ground. That gave the pointy toes extra
 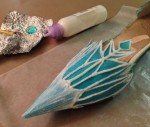 support, plus sealed the raw fabric edge of the cone very well. One coat on both shoes only took about 5 minutes, and waiting about 15-20 minutes, it was dry enough to add another coat, so I got 3 coats done the first evening, and another 3 coats the next day. By then the pointy toes would bounce back into shape as well as the original shoe, but they wouldn’t last against any major damage. Since there
 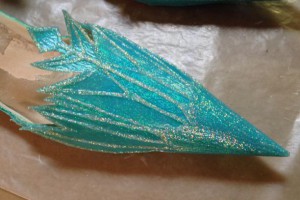 was only one week left until the first wearing, I decided to move on to the decoration, then I could always keep adding more coats of Modge Podge over the final decoration for even more stability.
To add the ice crystal snowflake details to the shoes, I used the same clear iridescent glitter fabric paints as the mesh shirt and the snowflake cape. Since 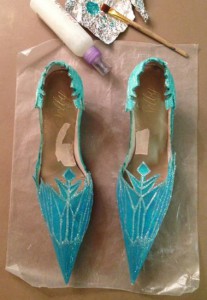 the glimpses of the shoes in the movie are so quick, I took some creative license to create more icy texture by filling in more snowflake line designs based on the crystal shape edges, with the pointy toes as the center of the front snowflake, and the back of the heel as the center of the back snowflake. I liked the raised lines in the design and thought they might help reinforce the structure of the shoe, especially all the cut points.
After all the lines dried completely overnight so no white was left, I brushed the same iridescent glitter paint over the entire shoe surfaces for more consistent sparkle, then they definitely looked magically icy!
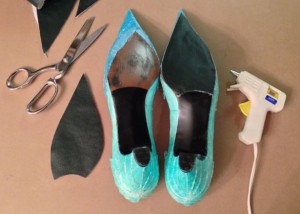 I had glued the fabric around the bottom sole of the shoe to create the pointed toes, but I knew that would wear too much from walking around, even if it was sealed well, so I got out some scraps of textured dark green vinyl leftover from the giant Godzilla foot I made for a movie promo, cut pieces to fit the bottom soles, and hot-glued them in place. This vinyl was backed with white fuzzy cotton, but since that left a white edge seen from the side that blended with all the crystal glitter, especially when covered in clear hot-glue and sealer, I didn’t mind. The green on the sole will never be seen when walking anyway.
 I gave all the raw edges a good solid bead of clear hot-glue all around, then started with more Modge Podge sealer, but only around the edges in hopes of keeping some traction from the texture of the vinyl. I made sure the sealer coated the entire corner of the sole, about 1/2″ in to the sole as well as above, and have 6 coats completed already, so hopefully it will hold up against wear. The pointy toes don’t touch the ground as much as the ball of the foot, and if the ball wears through the vinyl, I still have the sturdy sole of the original shoe before they completely fall apart. 🙂
I know Elsa’s feet aren’t as big as mine, especially my long toes, so her pointy shoes aren’t as long, but I think these are a pretty good interpretation and go perfectly with her magical ice ensemble! Can’t wait to wear them this weekend, but I still have to finish the sparkling snowflake cape first!


 Subscribe RSS