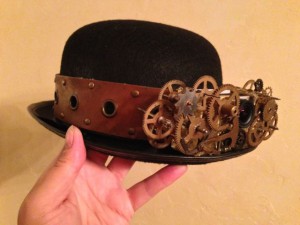
 I decided to get a GoPro Hero3 camera with waterproof housing for my cliff-jumping and snorkeling on my summer Hawaii trip, so I thought we should also use it for Halloween 2014 somehow…so I thought of incorporating it into a hat for a roving point-of-view video angle! I’ve been calling this the “hatcam” even singing “nana-nana-nana-nana-nana-nana-nana-nana-HATCAM!” but that’s not a very steampunk name, so I have christened it the Photo-Chapeau. I LOVE how this turned out, and it only took a couple hours to make! Ghoulish Glen gets to wear it for this party, but I think I’ll wear it on my brown velvet top hat the next time I get to wear my own steampunk.
 ![]()
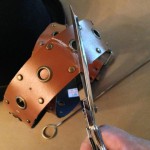 Glen wanted to wear a bowler hat with his outfit, thankfully found cheaply around Halloween costume season. I had a riveted leather belt complete with brass buckle in my steampunk stash from previous thriftstore trips, so I cut off the belt so it would sit buckled properly as a hatband, but still be convertible for other hat sizes in the future. For a perfect fit I had to poke more holes with a metal skewer.
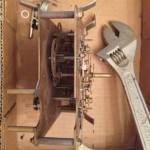 Several weeks ago I had tackled the teardown of this unidentified solid brass gear box to harvest the gears. We saw this at the electronics flea market this summer, and Glen asked “What is this?” The guy replied, “A dollar.” Still wanting to know what it really was, Glen jokingly commented, “It doesn’t look like a dollar,” then the guy said, “Ok, fifty cents.” Haha! We still don’t know what it is, but for only fifty cents I got a TON of awesome tiny real brass gears!
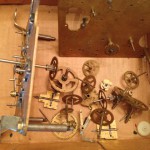 Taking it apart was a bit tricky, since there were five main posts anchored with nuts that I was able to crack with my adjustable wrench, but there were a couple connections that I had to bend the metal posts to get them to come out. I ended up with quite a nice pile of tiny gears, but they were all still attached to their posts and I couldn’t figure out how to get them off without damaging the gears, so I worked them into the final design.
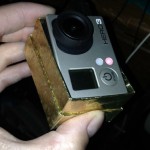 Since I wanted to hide the camera as much as possible, and we would need to take it out to transfer the videos later, plus turn on & off, I thought of sliding it from the top into a close-fitting box, so I went in search in my garage. I couldn’t believe that I had a gold cardboard jewelry box that fits the camera perfectly! Fantastic!
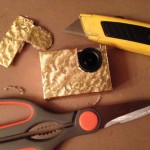 Since the lens sticks out from the camera, I cut a U-shaped hole so the camera could slide in from the top, then the lens would be cradled by the bottom curve, with the fit as tight as possible. I cut just inside the corners for more stability around the top opening, and by grabbing the bottom of the lens and gently pulling upwards, it comes right out without disturbing anything else. Whew!
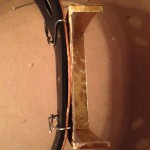 Now to attach the box to the hat. It was easier to work with the two halves of the box separately at this point. I poked holes in the box and fed wire through to the back, wired around the belt, then twisted and folded up to anchor. This way the camera box could be moved to a different hatband in the future.
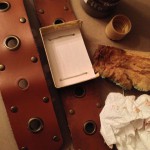 I forgot I wanted to paint the hatband before adding the box, so I carefully sponge-painted dark chocolate brown acrylic craft paint (leftover from the Painted Woodgrain project) along the edges of the belt to look like older leather since the belt looked much too new, as you can compare in the photo. This is a small detail but I think it really adds to the overall look.
 I hot-glued the box halves together, added the camera inside to make sure of clearance, then started hot-gluing the gears! I wasn’t quite finished when Glen was leaving, so I made him try it on to make sure it wasn’t too front-heavy. This hat fits tightly on his head so he will be fine, but the same hat on me falls forward to hit the bridge of my nose.
 ![]()
The tricky parts about these gears were the center posts in everything, so I couldn’t glue anything flat, plus sometimes hot glue doesn’t like sticking to metal very well. This led to 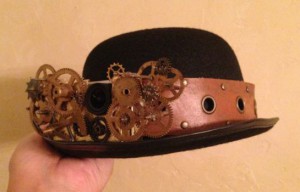 redoing several sections, and reinforcing with extra blobs from the back side, but I was really liking the dimensionality with texture on all three sides. Of course I couldn’t add anything over the top since the camera loads that way, but I disguised that by adding
 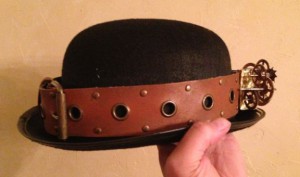 gears that could overlap the top edge from the front side. I had also purchased some jewelry/scrapbooking findings that were metal gears but a darker finish. I positioned some of the dark metal gears around the design so the dark camera lens would blend in better. Since those gears were flat, I also placed them strategically to give the brass gears extra support. Of course the buckle is in back, for a little counterbalance as well as style.
I am so happy this was such a quick project I could get completely finished among all my other ongoing projects for Halloween 2014! I can’t wait to see the point-of-view footage of my Halloween party on the 25th! ![]()

 Subscribe RSS