Once all the pieces for Elsa’s magical ice ensemble were assembled, dress, shirt, snowflake cape, shoes, and accessories, they needed some fine tuning before their first wearing…
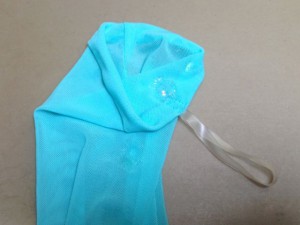 Peeling the glitter paint off my body when I painted the mesh shirt while wearing it made it stretch too much, but thankfully a quick toss in the dryer of the damp shirt shrunk it back to the proper stretch! Also, the shirt sleeves were so long even on my very long arms that to do the pointed cuffs on the sleeves properly, I had to cut and hem the sleeves so they would keep the arm length stretched completely, then add the clear elastic to anchor the point over my finger. I couldn’t do a turned cuff with my serger, I even searched online but no luck, and the stretch stitch on my sewing machine wasn’t working, so I rolled the hems and pinned them, then used the stretchable fabric glue I used for the ice shingles in dabs between the pins, letting them dry around some yogurt containers that didn’t stretch but kept it open so it wouldn’t glue itself together. After the glue was dry the next morning, I did a quick hand sewing job to add the clear elastic to the cuffs. Perfect!
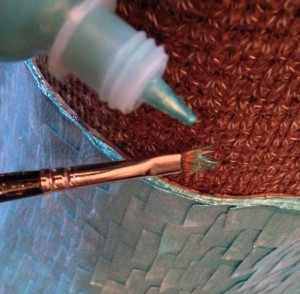 After all the ice shingles were completely dry, I trimmed them along the top edge of the bodice, closely enough so they wouldn’t be seen peeking out while wearing it as the coronation dress. The aqua canvas I used as the corset base fabric was a bit too pale and peeked out more than I expected, so I used the same aqua shimmer fabric paint as on the stretch velvet shirt and the base coat of the shoes to cover the aqua canvas edge, and glue the cut edges of the ice shingles flush to the bodice edge.
I had carefully handstitched the skirt slit closed for the coronation dress, so I cut the knot away and pulled the single thread hem stitch out to reveal the slit over the right knee. I have thought & thought about a simpler way to close the slit that would still look good when open, but nothing I can think of (velcro, hooks & eyes, zipper, snaps?) will stay 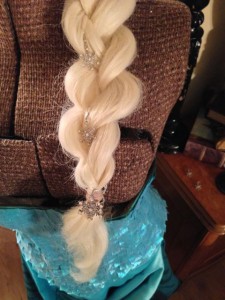 hidden enough from the opposite side when it’s in the other position. I’ll have to handstitch the slit closed again before wearing as the coronation dress again, but that doesn’t take very long, and as long as I’ve brought the right simple supplies with me, can even be done in a hotel room. 😉
Even this super thick costume wig doesn’t have as much hair as Elsa! Even though her original coronation twist shows no evidence of french braiding on the back of her head, it magically becomes a french braid when she transforms into her ice ensemble, so I french braided it loosely so it would look as thick as possible. This wig is mostly all one length except for the bangs, and it tapered nicely with all the ends captured in the elastic band, leaving a small tail. I curled the tail a little so it was neat and tidy, tied the largest snowflake around the elastic band with a small blue string, and tucked in the four fishhook earrings going up the braid.
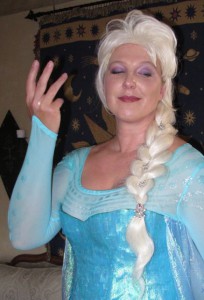 My makeup was pretty much the same as for the coronation dress, but a little more dramatic. Since that outfit I have acquired a new fiber lash “3D” mascara from Younique that lengthens even my pale sparse lashes and doesn’t flake off while wearing it. This was three full coats and I still don’t have as dramatic an effect as all their marketing photos
  show, but still better than what I have with just mascara, and better than glue-on false lashes since those never sit properly on my eyelids. I also bought a very shimmery deep royal purple eyeshadow from the same company, so I added that to my purple palette, plum eyeliner, black eyeliner, and blue-gray highlighter for dramatic purple eyes. Pale foundation, normal blush, and thankfully I have a lip stain I use all the time that is the perfect lip color for Elsa, so that was easy!
—
Now for the full materials list and what I spent. Luckily I recycled things like the shoes and had a lot of craft supplies I did not have to buy new! However I did use this project as the first for my new Silhouette cutting machine which was over $200, but since I plan on using it for plenty of other projects in the future, I’m not counting that cost here. 🙂
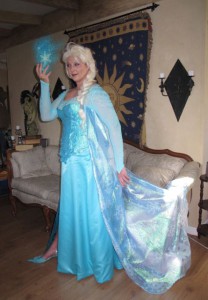 Total $65 for ice dress, shirt, cape & shoes:
flexible fabric glue for ice shingles = $6 (2 bottles 50% off each)
3 yds clear interfacing = $3.75 (1.5 yds for bodice, leftovers for shoes)
4 yds clear interfacing for snowflake appliques = $5.50
5 yds blue translucent iridescent for snowflake cape & ice bodice = $23
3 yds white translucent iridescent for snowflake appliqués = $14
clear iridescent glitter paint for shirt & snowflake cape = $0 leftovers + $3 to finish cape
5 LED balloon lights for the cape = free Amazon points ($0.50 each)
aqua mesh shirt size L from eBay free shipping no tax = $9
ice shoes:
free white low-heel pumps = $0
leftover blue translucent iridescent fabric = $0 (scraps from ice shingles)
Modge Podge matte varnish sealer from my craft supplies = $0 ($5)
leftover aqua shiny fabric paint for base color = $0 ($2)
clear iridescent glitter paint for shoes = $0 leftovers
same wig for both outfits = free Amazon points ($20)
snowflake jewelry earrings & necklace set for hair decor = free Amazon points ($20)
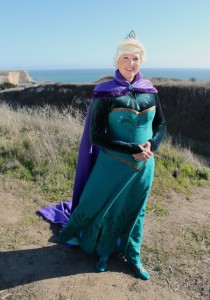 Also, the basic dress is shared by the coronation dress so they are the linings for each other, but if I had made the ice dress by itself with no lining, it would have added at least $40 to the total:
already had fabric for corset base coutil = $0
steel boning including two $5 lacing stays from Lacis incl handing & tax = $25
already had silver eyelets & eyelet tool = $0
already had 7 yds heavy duty white corset lacing = $0
3 yds aqua glitter satin = $15
It was $82 for the coronation dress including the base dress, so around $150 for TWO complete costumes really isn’t bad for this quality of effect! Of course that doesn’t count the labor time of approximately 6 weeks of several hours each evening, but obviously this was a labor of love for myself. Making these complete costumes for someone else would get expensive very quickly!
Hope you enjoyed these instructions as much as I enjoyed making the costume! 🙂

 Subscribe RSS
I LOVE IT!!!!!!!!!
I work as an Elsa entertainer myself and I think you are phenomenal! So inspiring to see such hard work and dedication into your work. So talented! xx