 Finally more fiber optic fun last Friday! I made this shawl and purse myself from fiber optic fabric I bought last year, and decided to wear it to my birthday dinner last week. It was still too early to see the glowing fabric in the restaurant or outside, so we had a little photo shoot in the parking garage. It looked awesome in person but can be tricky to photograph!
When I purchased the high-density fiber optic cloak fabric for my Glowing Ghostly Guardian costume, I also bought 2 panels of the standard-density style, 50cm by 150cm each. You can see the comparison here, with the standard-density at the top and high-density at the bottom. The standard-density looks like it has stripes since those are the fibers with thin white fabric between the fibers. For the same fabric panel width, the high-density 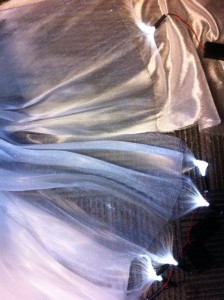 had 3 LED bundles, each with their own 3-AAA battery power supply, but the standard-density was a single LED and battery pack. Also you can see that the standard-density fabric continued for about 12 inches past where the fibers left the base fabric to be bundled together into the LED. There is definitely more glow and more transparency in the high-density version, which was perfect for my ghost cloak, but that was also much stiffer due to so much more plastic fibers. The standard-density had more of a normal fiber feel and drape, and it was half the price of the high-density panels…but this stuff is nowhere near cheap! This was definitely a big splurge for me, but I have been fantastically pleased with the results!
In my research last spring, I found out that two companies make this fabric, one in Italy, and one in France, each with specific US importers at the time. I bought all mine from LumiNightUSA as a custom order since they don’t sell the high-density option on their website, but my standard-density panels are their 19″x59″ options that include the LEDs & power supplies already wired, plus AAA batteries, all drop-shipped from their supplier in France (I got French newspaper as packing material and French batteries – heh!). I also bought the large rectangle size and a 19″x59″ panel of high-density for the ghost cloak, which was double the price you see there. 😮 Sparkfun wasn’t selling their option last spring when I was doing my research, but it looks like in addition to much smaller panels only 16″x30″ that are already hemmed to contain the fibers between the weave and the bundle, there’s only bundling on one end of the fabric since it’s half the length. Those are also much more DIY as far as the electronics are concerned, requiring you to add your own LED to the fiber bundle, plus wire to your own power supplies…but you could add a color-changing LED, which LumiNight doesn’t offer. 😉
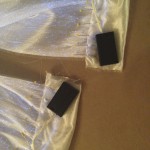 The first challenge was how to hide the bright LED glow at the bundle, as well as hide the battery packs but still be accessible to replace batteries and access the on/off switch. The 12 inches of plain fabric at the ends were perfect! I folded that in half, then folded it back to cover the other surface equally, but that still wasn’t enough to block the bright pinpoint glow from the LED. I had trouble with this issue making the ghost cloak too, so at least I knew what not to try. This time I decided white electrical tape might work better, and after wrapping several layers, even around the bend where the fibers were leaving the bundle, I finally had it opaque enough. Since the power supply wires were red & black, I also covered them with the same tape for good measure in case they peeked out, but the black battery box seemed to look ok just inisde the layers of fabric. I carefully pinned the folded fabric so that it all met just past the edge of where the fibers were woven into the fabric, then machine-stitched it together, leaving one end open to function as a pocket for the battery pack.
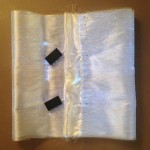 Both panels were the same dimensions, so as soon as both ends were sewn together, with the sides folded double into a hem, the shawl was all done. I did the same folding pockets at each end with the other panel, but how to turn it into a purse? I have seen this fabric sold as a drawstring pouch bag, but that has been done already, so I wanted a different style. I folded the entire panel in half so both power supplies met at the same end, then made a big loop so that the power supplies ended up inside the bottom of the pocket, 4 layers of fabric
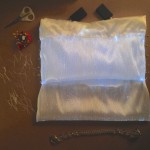 were the front of the pocket, and 2 layers were the back and flap that came over the front as an envelope-style purse. Here you see it inside-out, ready to sew the side seams so the raw edges will be inside the purse. One note is you must be very careful to avoid creasing the fibers! I had been so very careful, then my big kitty Onyx jumped into the box when turned my back, and in just seconds of trying to settle down for a nap he had creased my fabric in places and I could not even bend it the other way. So I hid the creases in the design the best I could.
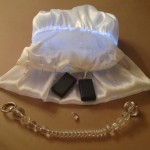 Turning right side out, I started making final design choices. I thought it gave it some curved flair to gather it a little, which also clustered the glow nicely. To gather, I machine-sewed without anchoring either side, left long tails, and very carefully tugged one thread from each side to ease the fabric into the gather that I liked. I sewed the folded fabric ends together, leaving the center open so the battery pockets were toward the sides for balance and easier access. I did sew the center closed as much as possible to limit anything else I was carrying in the purse from getting lost inside the pocket! I gathered across the fold of the flap to match the curve, but once the faceted plastic crystal handle was added by hand to each side, the purse wanted to flop inward to the
 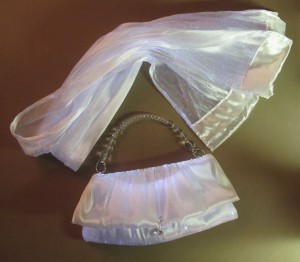 center too much, so I added a wooden dowel in a channel at the flap fold to keep more structure.
Voila! Here are the finished shawl and purse, all ready to wear! I had chosen some acrylic crystal buttons to match the handle, but instead of risking the fiber optics with a buttonhole, I handsewed both buttons on with a white elastic cord as the closure between them. I like how the all the acrylic crystal catches some of the light from the fibers, and since it’s clear and white, it can go with any outfit! 🙂
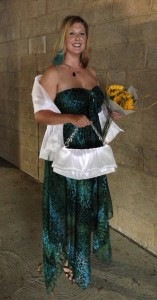
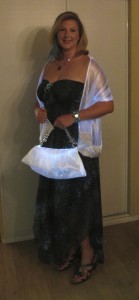
Here’s another view from the parking garage photo shoot, plus another at home taken with my timer so you can really see the glow. I can’t wait for another special occasion to wear it! 🙂

 Subscribe RSS