
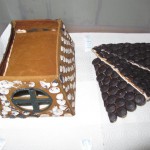
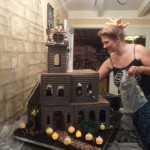
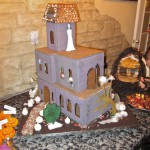
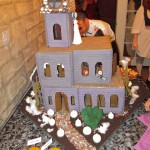
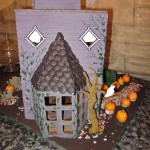
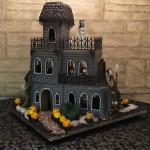
Way back in 1999 after I made the gingerbread thatched cottage in the summer, I thought it would be fun to make a gingerbread haunted house for Halloween, complete with fun tiny details. That very same fall Martha Stewart’s magazine had a big fancy kit for one, so I decided against it that year for fear of people accusing me of copying her. As my parties got bigger and bigger the idea kept getting postponed, until I was able to do the lighted gingerbread Hogwarts castle for the final Hogwarts Celebration in 2007, so I thought I had solved how to accommodate a major gingerbread project into my hectic party prep schedule. It was just as well that I waited so long because I have learned so many more cool edible art techniques over the years that the end result was much better, I designed it so that I could scratch some of my dollhouse miniatures itch that has been unsatisfied for years, plus I was even able to make it into a quiz activity for my party guests! You too can play the quiz from looking at these first photos, then I’ll reveal the answers at the very end after explaining the three-year saga, including a 4-minute webcam recap movie of the 50+ hours of construction. 🙂
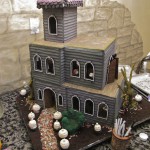
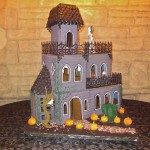
Ghoulish Gingerbread Haunted House
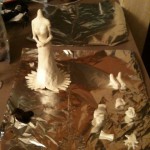
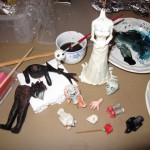
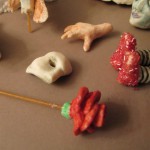
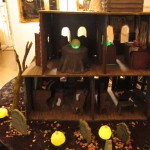
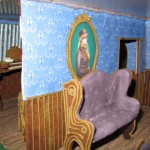
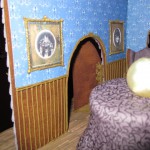
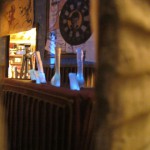
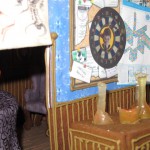
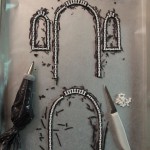
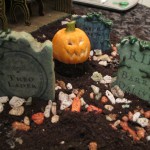
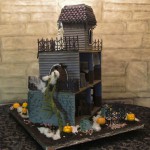
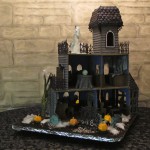
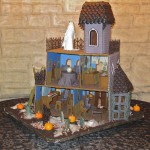
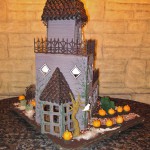
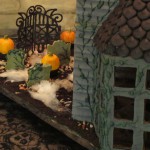
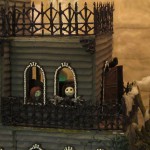
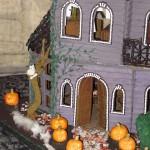
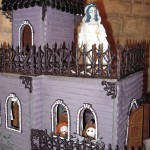
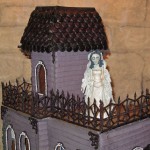
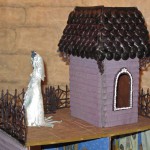
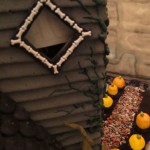
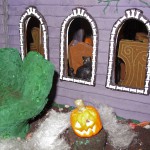
Spot the 13 spooky stories shown by the creepy clues & characters in & around the haunted house. Bonus points if you can also find all the denizens of Castle Brittahytta.
")
")


")
")


")


")
")

(answers are listed at the end before the photo gallery)
Keep reading for the full details of the Ghoulish Gingerbread Haunted House!
The Saga Begins…
 Well, best laid plans and all, this has taken THREE YEARS to accomplish! 2007 I had just finished the Hogwarts castle, so that was enough major gingerbread for one year, then 2008 was the first Eerie Elegance book
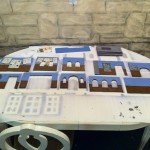
  with filming & editing video podcasts during Halloween season, plus a major work event right before my party, so no time for gingerbread that year either. The main quiz planning and cardboard mockup was done in 2009, along with sculpting several of the characters & clues from modeling chocolate or gum paste, and
  I got all the house pieces baked, but coming down to 17 hours before the party, there was no way I could finish to my satisfaction, so I stacked the pieces in the pantry & tried not to be disappointed. 2010 I had another work event the 3 days before my party, but I really wanted to get the house done! I tried my best to get it constructed before the work trip, but even though I had all the walls decorated inside and out, the unusually soggy weather defeated me, with a horrible reality-TV-worthy episode of walls falling apart in my hands the night before the work trip, and me very close to tears of frustration. So that was another year down…and now we’ve come to 2011 already!
 This year I was so thankful there was no work trip, and I took 2 days off work before my party, wishing it could have been more but too much going on, so my hopes were high! Of course because I am a glutton for punishment, I also decided to take on two other very major new secret projects in the Gate Ghost and Castle Brittahytta, so those took some time away from advance gingerbread prep, plus my elaborate costume didn’t get started as early as I hoped, but I did get a lot of the advance edible art done. All the characters did get decorated early as much as they could before final placement, my
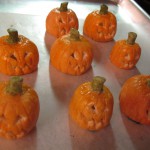
  fondant jack o’lanterns were sculpted even if not painted by the party, chocolate railings and gate were piped, and I even got lucky that I could have extra hands available for the main construction, which would be a huge help!
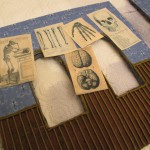
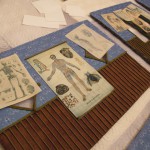
  I invested in an edible printer mainly for the Beware the Brocade wallpaper I had planned, but that led to other fun printables that ended up quite impressive and easier than hand-decorating, like wood plank flooring, the Picture of Dorian Gray from the 1945 film, some Haunted Mansion portraits I had, a ton of fun vintage anatomy charts and the Captain Hammer dartboard for the lab, and even a portrait of Miss Hermione G. Wells.
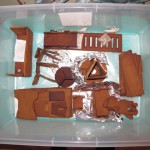
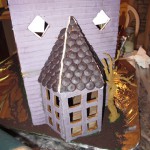
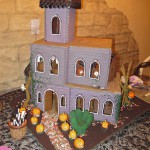
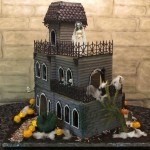
I had saved the 2010 attempt in my garage in plastic bins mostly to see how long anything lasted, and just in case anything could be recycled. Good thing because it helped remind me what final fitting issues I had between the cardboard mockups and the baked gingerbread – there are often issues in thickness for how corners fit together, plus I realized that the roof didn’t fit the house ceiling for some reason.  After so much grief with the roof last year, it had finally stabilized very well in the plastic bin I stored it in, so well that I was thinking of using it until I set it on the ceiling and realized it didn’t fit properly. I pulled off the candy melt shingles since I knew I could reuse those, carefully cut away the gingerbread pieces that didn’t fit, but saved the foamcore-braced top and corner pieces intact to add new baked pieces in hopes I could make it fit. I really wanted the mansard roof!
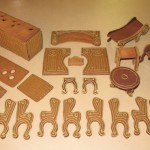
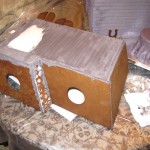
 I use structural gingerbread, which has no eggs and uses shortening as the fat. It’s so dry that it never spoils, and honestly tastes fine even a year later, since I was snacking on broken bits of the 2010 house while I was working on the new one. 😉 Many of the accessory & furniture pieces were still fine in the plastic bins all year, but I did bake new pipe organ sides and the curvy chair sides, plus anything that had warped or seemed too thin. Even the tower mansard roof survived completely stable, so I reused that intact! It’s harder than I expected to brace royal icing and gingerbread to the correct angles and have it set in the proper shape for the mansard roof shape. I had no problems with all the Hogwarts Castle buildings with peaked roofs! All the baking was done 2 weeks before the party, on schedule! I should have started decorating the walls sooner, but I need the entire dining table for the pieces to dry completely, and I was still using the table for my costume sewing that week.
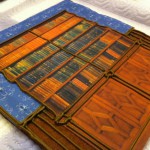
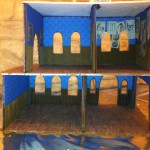
 The following weekend my costume was done, so the table was available, perfectly on schedule for the walls to be decorated. I had tried marshmallow fondant walls for 2010, but I wasn’t as happy with the result plus I hoped once the royal icing was hard, it would help keep the gingerbread from sagging in ambient moisture, so I used
  9 cups of pale lavender gray royal icing to hand-pipe siding using a large petal tip on all the exterior walls, then shaded them with black and purple food coloring sprays. Sadly 6 cups ran out, which is all that fits in my mixer at once, so it was tricky to match the color between batches, but at least then I still had 3 cups for construction so the seams matched the siding. Can you tell which walls were which batch? Hope not! 😉
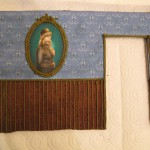
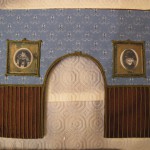
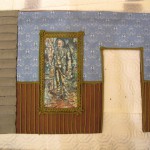
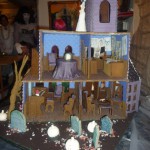
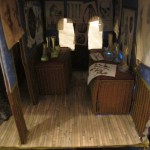
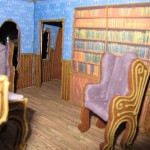
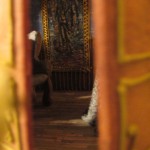
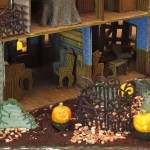
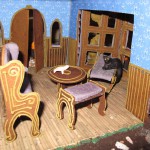
 I am SO thankful that kitties don’t like gingerbread, since the siding had to dry completely before I could turn them over to decorate the inside walls, so they were out on the table overnight. I liked how the half-wallpaper looked for 2010, so that was the plan again, but this time with frosting sheets and edible ink vs. rice paper and real ink not allowing anyone to eat the wallpaper. 😉 I was able to get two wallpaper sheets from each 10″x16″ frosting sheet, since I left the wainscoting as raw gingerbread brown with brown royal icing handpiping. I had thought I could print the portraits directly on the wallpaper sheets, but I wasn’t exactly sure of the final measurements after construction, so I printed those separately, cut them to each wall including window cutouts, attached them with frosting, then added frames or other 3D accents with piping over the top. I really love the huge bookcase, and extra cool that it’s from a photo I took at Lord Byron’s ancestral home last year in England! 🙂
Thursday began the final crunch, two days before the party. I finished piping the other side of the last double-sided interior wall, then got ready for outside decor when help was scheduled to arrive, finishing barely in time to gild all the icing picture frames with luster dust.
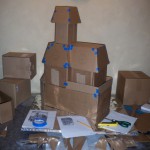
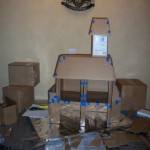
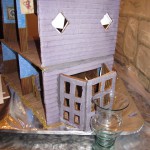
 After lack of inspiration for way too long, I was still hemming & hawing about the gingerbread base board when Scary Jerry arrived to help assemble it! With his help, we finally decided on the original large board on a turntable, since it barely turned all the way around, had just enough yard space, and still left room for a couple plates on either side of the table. We got the two stories assembled by 7:45pm Thursday night, with the roof & bay window waiting until the base stories were fully stable overnight. Thankfully the weather was also cooperating, but Jerry’s hands were extremely helpful! Much better than my “cake challenge” horror story from last year doing it by myself in soggy weather!
 After Jerry had to leave, I made the sugar glass & pulled sugar mess on the stove, and used the leftover hard candy to make the cotton candy mess out on the glass patio table for the graveyard fog, so the housecleaners the next day could clean up both messes for me. 😉 By the time I was done adding brown royal icing over the pulled sugar trees & picking up everything to be able to clean, it was 6am!
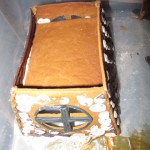
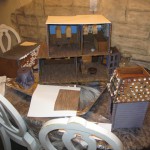
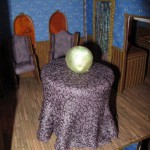
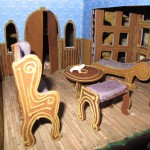
Friday I couldn’t continue edible artwork until after the cleaning was done, and I worked on outside decor during daylight while I could see what I was going. After other party food prep with another couple hours of evening help from Jerry, by midnight the outside was arranged to my satisfaction, so I finally was back inside doing more food prep & gingerbread house work. I mixed some marshmallow fondant purple with the mixer while I prepped the spiderweb pastry brie, then rolled out all the purple fondant furniture cushions and tablecloth, draping it over the gingerbread seance table, making sure no light could peek through at the  floor, then cut the top hole so it could dry enough overnight for surface decorating. I got the pipe organ & furniture assembled, the tower & main roof separately assembled on the table, and the bay window added to the house, so they could all dry overnight.
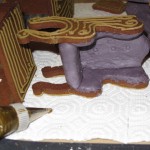
I had thought I would assemble the furniture before piping, but then realized after the first couple were assembled that would be much more difficult, so everything was piped in flat pieces as a “carved” pattern earlier in the week, then assembled after they were completely dry, before the purple fondant cushions went on. I struggled with the fondant trying to get it a more lush vivid purple velvet color, but very glad of the dough hook on my stand mixer, since I was able to multitask while it mixed the color into the fondant for me. When I was adding the cushions to the chairs, couch & benches, I kept wishing I could sit down in one of those nice thick cushions!
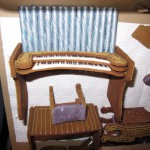
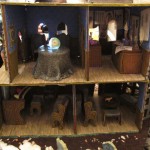
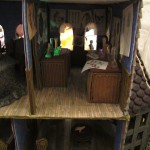
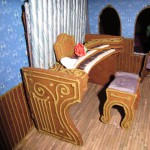
 Oh how I love how the pipe organ came out! It was one of my favorite pieces I designed, so I’m very happy it turned out that well! I piped black chocolate over white marshmallow fondant for the keyboards, and the “carving” was the same brown royal icing as the rest of the furniture. The pipes are candy sticks royal iced to a gingerbread backing board and sprayed with silver luster dust, then the rest of the gingerbread front sits against the pipes glued to the wall. Sadly I didn’t realize until final construction that my original plan was to offset the pipes higher so the backing piece reached the floor, so that was a last-minute rush of royal icing prayers and anything small & heavy in the kitchen for bracing to get it stable while guests were arriving at the party!
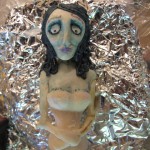
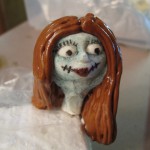
 By 4am I knew I couldn’t start rolling any black chocolate shingles yet since I was hitting the wall, plus I thought it would be better to shingle after the roof was in place, and I was still hoping the main roof would be stable enough by morning to add to the house. After a little much-needed sleep, on party day I got up about 9:30am, quickly checked the webcams that were thankfully still working fine & aimed properly, then got straight to work on the gingerbread house & final character work again, gluing head on Emily’s head onto her body, piping hair on Sally & Emily, drawing the design on seance tablecloth, and gluing the sugar trees in place, all while baking everything I had prepped for the freezer weeks earlier. While that work was drying or setting, I went back to other pending party prep.
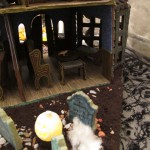
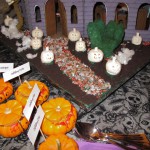
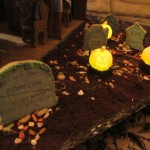
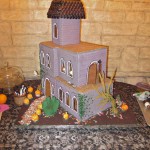
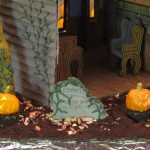
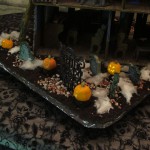
As of 5pm since it still wasn’t trustworthy, I gave up on setting the main roof on, so I used the woodplank frosting sheet scraps to cover the bare ceiling piece and set the tower on that, unglued in case I had time after the party to try the main roof one more time. I also knew  there was no way to get the window trim done or the jack o’lanterns painted in time, let alone fuss with any of the extremely fragile black chocolate railings, so I decided I would get the house ready enough for the quiz, then leisurely finish the details after the party to my satisfaction. I started placing characters and decorating the yard, which thankfully went fairly quickly since those had been finished in advance and mostly just set in place without needing any royal icing to anchor them. Only Jack gave me grief in the window! After I glued the Tasty Tombstones in place on the foil with royal icing and propped them up with cookie crumb dirt and chocolate rocks, I piped a dam of royal icing and set cookie crumbs into the dam all around the baseboard and the edges of the house, then I spooned cookie crumb dirt loose onto the foil-covered base, artistically sprinkling the chocolate rocks last. From necessity of the time crunch, I just slapped green royal icing directly on the sides of the battery tealights and dipped them in the cookie crumbs, which actually worked really well! Royal icing snaps off of non-porous surfaces so I cleaned the tealights fine later.
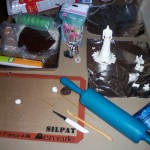
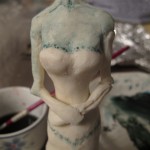
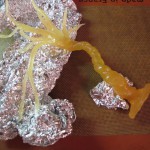
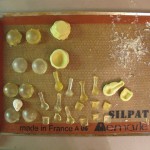
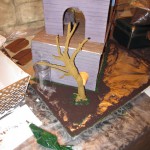
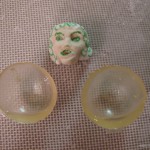
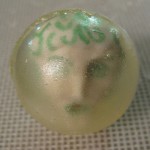
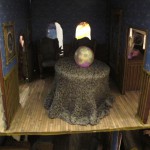
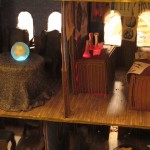
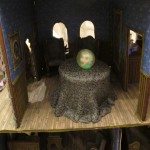
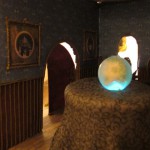
 I had saved placing the sugar glass for last because the weather was already getting more humid, and the lab glassware was a bit fussy not sitting upright in the holes so needed anchoring with royal icing, but they looked great with the underlighting. I was also so very pleased that Madame Leota’s crystal ball worked so well! I had made a 2-part food-grade silicone mold of a ping pong ball, and sculpted Leota’s head sized for the mold from white chocolate with royal icing hair, with features drawn with green food coloring pen. When I poured my sugar glassware for the lab, also in smaller silicone molds I had made, I poured the crystal ball halves, making sure each mold was coated completely and evenly but then dumping the excess out right
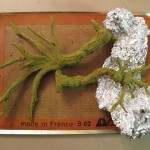
  away so only a thin layer of sugar was in the mold. I set them open side down on the silicone mat to cool so they could drain & set as evenly as possible. I could have made it easier on myself to make more glassware molds so I didn’t have to pour so many batches of sugar glass, but that food-grade silicone is expensive stuff! By making so many batches, I made a crystal ball set each time too, so I had plenty to choose the best, plus have backups in case anything happened. This was also when I made the two pulled sugar trees, using the rest of a batch of sugar after filling the few molds. After all the sugar glass was fully cooled, I stored them in plastic tubs with silica gel packets so they wouldn’t go gooey. The trees I covered with brown royal icing spread as bark in hopes that would protect them from moisture plus look more realistic.
The afternoon of the party, I glued the sugar beakers and flasks in place on the lab table holes with royal icing so they would be lighted from underneath as the lights changed colors. Then I chose the best crystal ball pieces, set Leota’s head inside the back half, and I used an open flame very quickly to heat the seam so the two halves would stick together without discoloring the sugar. It worked, stayed together resting in place on the hole in the table, and with the color-changing light hidden under the table, it looked even better than I had hoped! 😀 (This was the only effect that didn’t last as long after Halloween, since the sugar stayed hard even through some rainy weather outside, but began crystallizing internally after about a week so it became too opaque to see Leota’s face anymore. The lab glassware lasted fine because the crystallization just refracted the colored lights even more. The rest of the house was still looking great through mid-November!)
The pipe organ was giving me grief all afternoon since the candy sticks on the gingerbread backing were too heavy for the royal icing to anchor them to the wall, and I realized I attached them wrong so I was out of luck. I was finally able to use a scrap of gingerbread as an extra full backing piece, and with some clever bracing while it set until the very last, it finally stayed up for the party! That was finally about 7:45, one of the last pieces to go in place, then I finally got into costume by 8pm, sadly often the norm that I’m not in costume until after a bunch of guests had already started arriving…but most importantly the house was ready to play the quiz! 😀
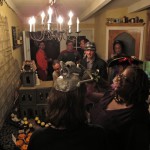
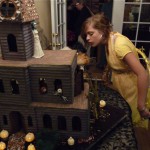
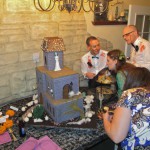
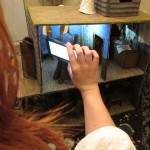
 I insisted everyone play the Ghoulish Gingerbread Haunted House quiz to “Spot the 13 spooky stories shown by the creepy clues & characters in & around the haunted house. Bonus points if you can also find all the denizens of Castle Brittahytta.” Everyone enjoyed my creation, even though slightly unfinished, since there was such a crowd leaning in to inspect the details that many people had to wait their turn for a closer look!
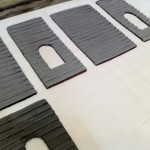
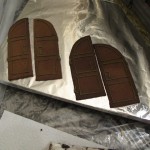
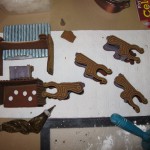
 After I recovered from the party for a few days, I got back to work on final details. I had bought cute tiny bone shape candy sprinkles that I wanted to use for window trim, so I melted more black chocolate then piped the window shapes on wax paper where I had traced the windows from the cardboard templates. I wasn’t using my silicone mats since I discovered while unpeeling the piped chocolate railings that the mats don’t bend easily enough. Wax paper works much much better, especially when you need to draw to plan exact shapes. The chocolate would actually set too quickly to get the bones placed, so I often needed to heat an area with my candle
  lighter first. I made sure the chocolate was in the approximate shape, then after it set a couple minutes but before it would shatter, I gently trimmed with a paring knife to get crisp clean edges. I’m really pleased with how these turned out as separate pieces, since piped directly over the house siding they would have been lumpy.
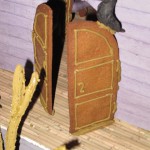
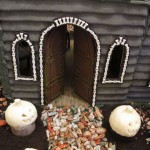
Since the doors were already in place standing open, I made the door trim in separate pieces which worked well. The chocolate starts melting in your hands of course, so I used more melted chocolate to pipe “glue” in place so they set firmly much more quickly than royal icing. It took a very gentle touch so I’m glad that only one window broke during assembly and it pieced together in place fine. It definitely made the house much more finished already with all the trim in place!
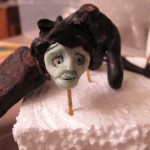
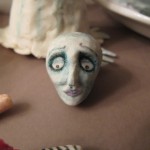
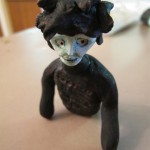
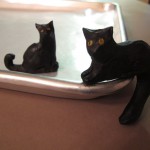
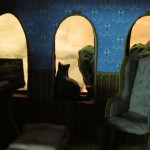
 The only quiz clue I didn’t get done before the party was the Dark Duo, my black cats Ebony and Onyx. I gave bonus points for finding the denizens of Castle Brittahytta but only Miss Hermoine G Wells’ portrait was on the wall. I sculpted both kitties from black chocolate, giving Onyx wider eyes and bigger fluffy tail hanging down from a comfy spot, and Ebony was in a classic windowsill pose with her skinnier tail curving nicely, just like she does.
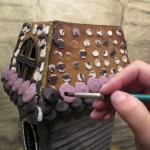
 The railings had to be placed last since I was worried about reaching over them, so I finished the shingles on the tower next. I had thought I would roll out thinner shingles, so I had melted most of my candy discs, but since the bay window roof was already discs and I only had the tower left after giving up on the main roof, I just used the discs I had, including other colors when I ran out of black and painting with food coloring after they set. Sadly I shouldn’t have painstakingly removed the shingles from the tower roof after all! However I did decide I didn’t like the roof windows, so with re-shingling anyway, I shingled over them. Since I was already painting with black, I just painted all the roof seams, and I think that looks just fine without any extra seam trim.

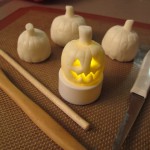
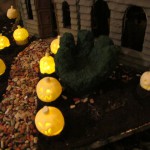
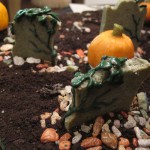
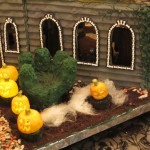
I finally handpainted the glowing jack o’lanterns with a custom orange mixed from brown, red and yellow. I tried shading a couple but they looked better with the natural shading from the orange and carved grooves, especially when lighted. All 13 of those painted immediately made it look a lot more like Halloween!
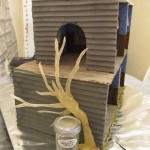
 Next I piped the green royal icing spooky ivy all over the house and the now-crumbling gravestones after the real Dark Duo nibbled them! (hrmph!) I liked the look that not as many leaves were growing but the scraggly vines had taken over for years. I covered the whole bay window and up to the main roof and around the front door, plus climbing the tree and all over the opposite side wall under the balcony. Even though the icing was too runny to hold the leaf tip shape, I think it still was effective. It sure was hard to mix a green that dark!
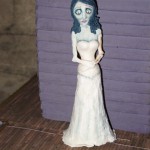
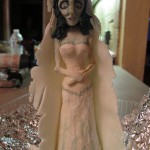
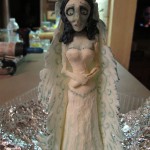
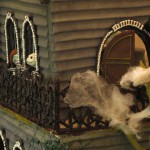
Last but definitely not least were the web-pattern “iron” railings! I am so relieved the chocolate railings worked since they really improve the overall look! I’m actually okay with the fact that the mansard roof was never trustworthy enough to set in place, since not only did it save me from all that re-shingling, but I think I like the extra railings better! I had repaired the railing breakage from removing from the silicone mats, but I probably should have left them in sections since the long sections broke in multiple places anyway while setting in place. With so much railing around the main roof I decided the tower didn’t need railings, so I added piping onto those to make the longer main roof railings. After I finished her full-length, handpainted, two-layered, tattered veil out of white fondant, Corpse Bride ended up fitting better on the main roof instead of the very top of the tower anyway, so it worked out well. I had a couple spots where the railings didn’t fit (what the heck did I measure so many times?!) so I used some spiderweb brackets to fill in, or explained that the tree had grown into the railing and broke it. 😉 I had piped the spiderweb  brackets not knowing for sure where they would fit, but I absolutely love them on the tower!
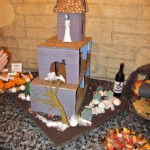
I’m very glad the graveyard gate also survived assembly only glued to the foil on the baseboard! I filled in with more chocolate rocks as a graveyard pathway too. I had saved some cotton candy fog for the final photo shoot and took about 150 MORE photos once it was finally finished to my satisfaction! 🙂
Of course there are a ton of detailed photos in the gallery below, and as promised, here is the webcam stop-motion movie including a 360-degree view of the finished house, made from about 3000 minute-by-minute image captures AFTER sorting through removing the dead time…that’s 50+ hours not even counting the off-screen work…whew!

After all this work I have now decided I will keep this gingerbread house around through Christmas and give it an “overlay” of snow and Christmas spirit, just like the Haunted Mansion at Disneyland! 😀
So, did you find all 13 spooky stories plus the bonus question? Here are the answers!
Ghoulish Gingerbread Haunted House Answers
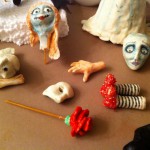
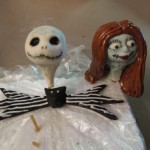
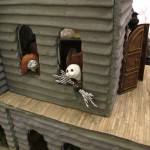
1. Nightmare Before Christmas = Jack Skellington & Sally mischieviously peeking out of the balcony windows
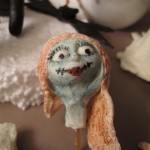
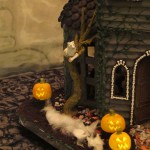
2. Emily the Corpse Bride = standing sadly up on roof on widow’s walk
3. Dr Horrible’s Sing-Along-Blog = Captain Hammer dartboard on bulletin board in the lab
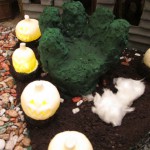
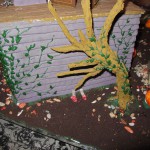
4. Edward Scissorhands = hand hedge in front yard
5. Phantom of the Opera = face mask & red rose on pipe organ
6. The Picture of Dorian Gray = large portrait on inside wall in “attic” seance room – freaky multi-colored version from the 1945 film
7. The Raven by Edgar Allen Poe = the Raven “still is sitting” perched “above my chamber door” to the balcony
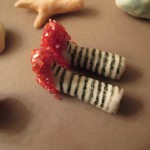
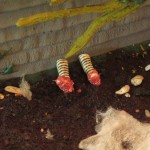
8. Wizard of Oz 1939 film = the Wicked Witch of the East’s legs in striped socks wearing the Ruby Slippers sticking out from under the house
9. Disneyland’s Haunted Mansion = Madame Leota inside the color-changing sugar crystal ball, also two spooky portraits in the seance room
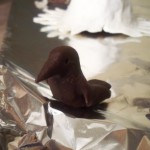
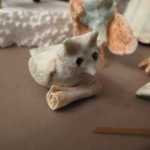
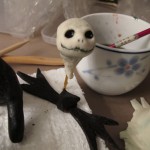
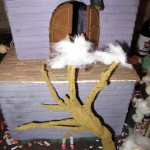
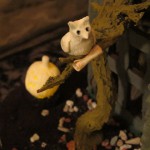
10. Harry Potter = Hedwig holding a scroll perched in the bay window tree
11. Addams Family = Thing (disembodied hand) crawling on the coffeetable
12. Jekyll & Hyde = envelope to Dr. Utterson with explanation letter signed Henry Jekyll on lab table
13. True Blood = Bill Compton’s gravestone in the graveyard
Bonus: Denizens of Castle Brittahytta = Portrait of Britta as Miss Hermione G. Wells behind couch, Onyx on the lounge chair in the bay window, Ebony sitting in the front window behind the hand hedge.


 Subscribe RSS

Absolutely Awesome !!!!!!!! You are my hero ! Everytime I checkup to see what you are up to I am always so surprised. And the best part is that when I am in a rut for ideas, something you have done sends my mind in a whole direction. I have a new idea for you. Email me and I will give the idea, but hurry, hurry, hurry because I know how you like to craft on the cheap and it won’t last long!!! Spellbound, Astrid
This is too amazing! Absolutely unbelievable! What perseverance!!! Going to post this on my Facebook.
amazing stuff!
That is awesome, I would love to make one out of wood and keep it forever.