
Jigsaws are fun, as long as you’re not tackling a project not intended for a jigsaw!
My jigsaw saga has been a pain this year. My parents got me a recharegable battery cordless tool set when I moved in here, with drill/driver, jigsaw, sander & flashlight. It was very handy, and I’ve used it several times the past couple years. So, before I left on vacation, I got everything set up to cut out the faux stone archway reinforcement plywood, but all my batteries were drained and my charger wouldn’t work! Argh! After a phonecall to the manufacturer the next morning, she admitted “well, that’s a set with a 2-yr life span anyway, so I woudn’t bother with the replacement charger either”…so the backup plan was to borrow my dad’s tools after I got back from vacation, and I’ll probably be getting more replacement power tools for Christmas now.
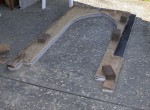
Last weekend the jigsaw showed up when my parents came to my Choral Project concert, so Sunday afternoon I started sawing. My dad had seen how thick the plywood was so warned me to go slowly and asked if I had extra blades. Well I had the blades from my jigsaw, so hopefully that would work. I went slowly and the one whole side from straight through the curve to the top point of the arch went just fine, but of course I couldn’t turn the corner so had to start at the bottom of the other side to meet at the top. I don’t know what was so different about the wood on that side, since I even cut fine through knots on the other side, but I broke all three blades I had, and the two I had from my jigsaw would only fit my dad’s saw after I ground them down with my dremel – fun sparks grinding metal though! ![]() *sigh* I had to stop for the evening, then went to Orchard Hardware at lunch on Monday, continuing sawing Tuesday evening, not breaking any blades this time since I bought heavy-duty wood blades…but it was DONE! I was able to get the construction adhesive on and the whole thing braced with bricks before it was too dark, so here’s a photo.
*sigh* I had to stop for the evening, then went to Orchard Hardware at lunch on Monday, continuing sawing Tuesday evening, not breaking any blades this time since I bought heavy-duty wood blades…but it was DONE! I was able to get the construction adhesive on and the whole thing braced with bricks before it was too dark, so here’s a photo.
Next will be painting the wood black so it doesn’t show through the sliding glass door from the inside, then seeing how the hinges will work with the door. I have a feeling we still won’t be able to open & close the door, since I still can’t brace the arch to the wall, but we’ll see how it works wedged in with the concrete steps and leaning under its own weight against the wall. I can barely lift this myself, so it’s plenty heavy now. Definitely can’t store it in the garage rafters anymore!
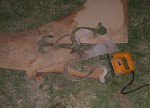
While I still had custody of the jigsaw, since it’s going back to my parents this evening as I leave momentarily to drive to Sacramento for the weekend, I decided I wanted to embellish the door with some cool wrought-iron-look hinges like we saw last summer in England. The leftover paneling that was used for the arch door last year has been sitting outside, being trashed by the elements all year, but after cutting & painting I thought it would be the perfect thickness. I grabbed a few tour photos for inspiration, but I knew I couldn’t make them that elaborate, so I sketched in chalk on the leftover paneling, cut that one out with the jigsaw, then traced around that one to cut out the matching hinge. These will also be painted black, then glued and screwed to the door underneath the functional hinges. I think they’ll look cool! ![]()
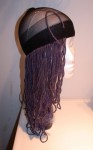
I have also made progress on my Corpse Bride costume. I got what I think is the perfect color yarn, so I started on the wig already. Here is the first row around the bottom of the wig cap already stitched on. I’m using a curved tapestry needle which is nice & easy to catch enough wig cap without poking into the foam head. Since the photo, I’ve done another row around, plus both edges of the part. I’m leaving the strands as large loops vs. cutting at the bottom, since not only does it prevent me needing to tie any knots, but I think it will help with the messy curls effect. To fill in properly, I’ll need at least 2-3 more rows around, but I think it’ll look very authentic when it’s done.
I have made other progress, and my costume will not only look much better, but still be much less cost to me than the $200 for the official deluxe licensed costume I was pointed to in my comments, but mostly because I had stuff already I could use vs. buying from scratch right now. My natural-cream loose-weave muslin I already had has been bleached, ready for swirls to be painted and the edge cut into swirls for the veil, I have bought some paper roses for the veil decoration, bought a silk bridal bouquet that I will spray paint blue, and I already have the blue tights and white shoes. I had bought some white opera gloves for $3, but Emily’s gloves are more sheer, plus fingerless, so I’ll use some of the veil fabric for ragged gloves instead. Don’t worry – the gloves will go to good use…
My plan so far for the bones are to use a white opera glove with sewn extension up to my shoulder, then paint the bones on the glove as shading. For the right leg I’m not sure yet if I’ll cut up an old white pair of cotton stretch pants or find an opaque white pair of tights, but the painting plan is the same for the leg bones. I think that will work, be easy enough to assemble for my party, then I just have to concentrate on the blue & then facial makeup, which will take plenty of time already. I like wigs for costumes, since then I just have to french braid my hair wet the night before, then throw on the wig vs. spending time on my own hair! ![]()
I looked around for a strapless bra thing to use as a corset base, but I’m giving up and just making another corset from scratch using fabric I already have. I’ve made two corsets and a couple other boned bodices before, so it shouldn’t be too daunting, and custom-fit to me will look the best and be able to cinch in my waist as much as possible (as long as I have someone else there to lace me up properly!).
Off I go for the weekend now…Halloween shopping with Natasha…hooray! ![]()
 Subscribe RSS
